Sunday, June 27, 2010

TRANSMISSION TOOL TIME

A customer brought me a Saab V4 transmission that had been "completely overhauled" by his mechanic. The "completely overhauled" trans made it 964 miles before it blew. The sucker blew on the freeway. In rush hour traffic. My very unhappy customer said his "wrench" told him that he just used "simple tools" to overhaul transmissions, and "none of that fancy stuff...."

The description of the wrench's "simple tools" sounded like the ones shown here.

This is my Saab factory transmission press. Without it, you can do more damage to a V4 transmission than you fix!

I used EVERY TOOL shown here, along with the factory press to do the overhaul, so the trans will stay together and give great service for thousands and thousands of miles.

When I overhaul a Saab V4 transmission, I do it right the first time, using precision tools and the Saab factory service manual
. If your transmission needs an overhaul, make sure your mechanic has the factory press and special tools. If he doesn't, then find a mechanic who does. Don't believe a mechanic who says, "Oh, I don't need a special transmission press or any fancy tools."
Have it done right the first time, or you'll get to pay twice for a rebuild.

SAAB WIPER MOTOR: OF COURSE IT NEEDS REBUILDING!

This is a dead Lucas wiper motor, as used in 1970 and later Saab 95 and 96 cars. It ran very slowly on one speed only, and refused to self park. After close to 40 years of work, it needed some attention.

This motor was actually less grubby than most of the motors I get to rehabilitate.

Now the ancient motor is CLEAN [!] and has a new brush and spring plate installed, and the self-park mechanism has been repaired. Speaking of ancient parts, I built that Heathkit multimeter in 1956. It still works like new!

Here are all the "guts" of the Lucas motor, just before reassembly. The self-park switch is out of sight, mounted on the main motor body.

The moment of truth. The motor is mounted on the test board. Yup, it works on both speeds [at the correct rpm for each speed] and it self parks. Voila!

Looking better than new, Lord Lucas' wiper motor is ready for another 40 years of work...
When you send us your wiper motor, you can expect a quick turnaround time and reliable wipers for years of rainy days to come.

Monday, June 14, 2010

WIPED OUT - Saab V4/99 Windshield Wiper Motors

Why is it that old Saab windshield wipers work "really good"....except when it is raining really hard? Remember, these are LUCAS wiper motors after all....so what did you expect?


These wiper motors are old and tired!
I have been rebuilding these Saab 95/96/97/99 wiper motors for years so I know what it takes to make them operate like new. I always test them on a test board, with the same electrical circuitry found in the car the motor came out of. No surprises that way!

This is a wiper motor on the test board. The wiper is the type used in Sonett II, Sonett V4 and Saab 95 and 96 cars through model year 1969. I test the motor for correct high and low speeds and for self-parking at the correct wiper angle. The test board has the push-pull switch [early cars] and the column-mounted stalk switch [later cars].

This is a Sonett III [or Saab 99] wiper motor on the test board. I wired in the relay and the second [longer] stalk switch for testing this series Lucas motor.

The three Lucas wiper motors used on the Saab 95/96/97/99 cars. The early motor is on the left, the Sonett III and Saab 99 motor in the center, and the Saab 95/96 motor [used from 1970 onward] on the right. The first two are freshly rebuilt and tested. The motor on the right is how they usually look when I get 'em for rebuild---NASTY and DEAD!

Same motors, flip side. I make the nasty, dead motors look--and work--like new. I have rebuilt a TON of these Lucas motors for Saab owners. So quit worrying about the weather when you drive your wee Troll--just send your wiper motor to Ashcraft's Vintage Saab Parts for a thorough rebuild! Then you'll have one less thing to worry about on your Saab!

Friday, June 11, 2010

TILT HOOD TALK

I got a call from a Sonett owner who wanted more detailed dimensions of the hood latch arrangement that I showed in the blog. Truth is, Sonetts are almost KIT CARS and no two Sonetts measure the same in any one dimension. Also, I built this to fit the steel reinforcement "skeleton" that I built and bolted to the underside of the hood ass'y. My next act is to fabricate the lock-down drop link that will bolt to the skeleton. The drop down link fits into the latches and locks the hood down on both sides. Ah...THAT should be interesting!

This is the FOURTH generation of tilt hoods I have done on Sonett III cars. I will add all of this information, with dimensioned drawings, in my book SAAB SONETT III TILT HOOD CONVERSION, available from Ashcraft's Vintage Saab Parts.

Converting a Sonett III hood ass'y to tilt is a MAJOR job, no doubt about it. But to those who have made the conversion, actually being able to easily DO something in the engine bay makes it all very worthwhile. And at a gathering of the Troll Faithful, the tilt-hood Sonett III is the one that will have all the lookers. Guaranteed.

Thursday, June 10, 2010

LATCH 'ER DOWN...SONETT HOOD LATCH

A tilt hood requires a fairly interesting latch-down arrangement. I have used several different types, and I think this one, using Fiat latch assemblies, is the best because it's simple. Since you probably don't have any Fiat latches laying around, you can check your local wrecking yard for cars with similar style latches.

You are looking at the RIGHT side of a Sonett III engine bay frame, just behind the coil spring. The 0.125" thick plate bolts to the frame and supports [A] the cross rod [top center], and [B] the Fiat hood latch assembly.


I welded a pair of 5/16" bolts to mount the Fiat hood latch ass'y.


Fiat hood latch set into place on the bolts. I attached the release link [at the bottom of photo] to the actuating arm on the cross rod. Just out of sight at the bottom is an adjustable Heim ball socket end. Most any real auto parts store carries ball socket ends.


This shows the 0.375" diameter cross bar and actuating arm ass'y, in place and attached to the release link on the Fiat latch. I had to weld 2 pieces of rod together to get a cross bar long enough!


Another view of the cross bar, the actuating arm and the release link, attached to the Fiat latch assembly. The angle steel on the right is part of our Drakenparts front frame stiffener kit.


This is the Fiat latch that I mounted on the LEFT side of the engine bay [coil spring is on the left, just out of sight]. The mocked-up clevis and rod shows where the hood release pull rod will go through the front wheel splash panel, into the cabin. The pull link directly below the latch also has an adjustable Heim ball socket end.
I like this installation because it lets me locate the release pull rod in the same mount where the original hood release "T" handle was mounted. Simple and "sanitary"!

Tuesday, June 8, 2010

Sonett Headlamp Magic

Access is the name of the game with the Electric Norseman. But then there are those pesky pop up headlamps that mount to the hood assembly itself. Hmmmm...I have handled them in a number of ways on S-III tilt hoods but I like this one the best---the headlight assembly is mounted to the frame of the car, NOT the fiberglass hood.

The headlamp up/down mechanism remains in place and in alignment, whether the hood ass'y is open or closed.


This is the pop-ups on the bench, with the actuating cross bar in position. Some of the mounting brackets are also shown.


The right side pop-up bucket, mounted to the frame. I built the mounts so the buckets are adjustable in all three planes. Making them go up and down is GOOD! Making them fit the hood openings at the same time is even BETTER!


Left side bucket ass'y mounted to the frame. How does it work? Like a champ! See--the headlamp buckets don't know they aren't still mounted to the hood!

Monday, June 7, 2010

ELECTRIC NORSEMAN

Yup. It IS an electrified 1973 Sonett. I call it "The Electric Norseman." The 110 volt charging port is where the gas cap ustawuz. I have the battery racks installed for eight big ol' 12 volt electric car buggers. Six in the trunk area and two up front, plus a small "regular" battery to run the wipers, the fans, the lights, and oh, yeah, the air horns.


So everybody asks. "How fast?" and "How far?" I'm hoping for 50mph with a 50 mile range. We'll know that when it's finished. I'm keeping it as LIGHT and SLIPPERY as possible. More on those efforts later---stay tuned.


I've been a Saab "wrench" too long. Can't stand a Sonett without a tilt hood. Note that the regular hood door still works AND that the pop-up headlights remain in place [and alignment] when the hood is tilted forward.
I'm working on the custom hood latching system in my shop this week, so I'll have photos and info soon!

Friday, June 4, 2010

Saab Distributor Rebuild

Saab V4 distributors have a lot of parts inside, as the exploded view drawing shows. Not only do these parts send spark to the correct spark plug at the correct time, they allow the spark to be advanced according to the needs of the engine. This means the engine will run SMOOTH, man! The boxed drawing shows the complete, assembled distributor with cap and wires.

The springs and weights provide the MECHANICAL advance. The vacuum diaphragm provides the VACUUM advance.


This is a typical used distributor as we receive it for rebuilding. SLIMEY! YUK! But part of the yuk is black paint, part is grease and grime. 1698cc Ford V4 engines were painted BLACK, and so were the distributors for those engines. Paint flakes off, crud goes one---makes 'em look UGLY!


Bosch distributors for the V4 Saab cars had no bushing at the drive end, so the center shaft runs in the aluminum case, which "hogs out" to a larger hole. That makes for a sloppy cam at the top, which lets the point gap vary all over the place. As point gap varies, DWELL varies, and ignition TIMING varies. The result? The spark plugs fire at the wrong time, and the engine is NOT happy about it. Here I am using my lathe, boring the distributor for a bushing.


Here's how I setup the lathe for boring the drive end of the distributor for a bushing. I use a special tool to mount the distributor body so it is exactly centered in the lathe for the boring job. It's nice to have the right tool for the job!


I use a special driver to press the bushing into the distributor body. Then I ream the bushing to give the correct clearance for the distributor main shaft.


AHA! The distributor body and new vacuum advance unit. They look better without the SLIME. The reassembly and testing are next. That's when the FUN begins!


I use the SUN distributor test machine to set the mechanical advance curve. I tailor the curve for the projected USE of the engine. For example, professional RACE engines get a different curve than your street engine because they are run consistently from 6-8,000 rpm.

If your engine has over 70,000 miles and you've noticed it doesn't run or idle like it used to, it's likely that your distributor is tired and ready for an overhaul.
Your engine will run much smoother, accelerate better, have better gas mileage.
You'll find it's money well spent!


Wednesday, June 2, 2010

Saab 95 Wagon Restoration: Sheet Metal - Part 1

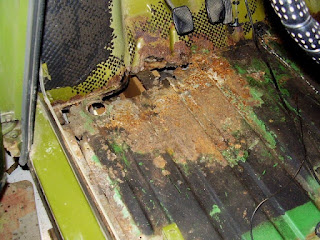
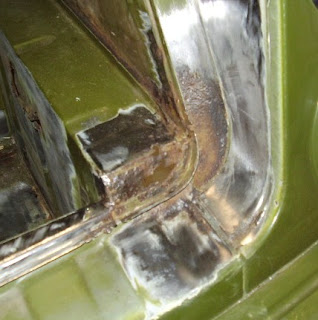
The 1973 Saab 95 Wagon that is in Mark's shop is getting a thorough mechanical restoration, including as it turns out, a good amount of sheet metal. Quite a few of the usual areas have suffered from demon rust, so here are a few pictures that illustrate how much fun a rusty 95 can be:


Saab 95 Wagon ready for a stripping


Passenger side front floor


Driver side front floor


Left front inside fender


More front floor rot


Left front wheel well


Left rear engine bay, behind shock tower


Left rear wheel well splash panel


Left side floor, behind driver's seat


Old license plates and Guinness Beer cans used to patch rust holes!


Left rear hatch corner, after cleanup


Right rear of hatch, after cleanup


Right rear suspension mounting area

After a lot of cleaning, grinding, and wire wheeling, all of the trouble spots have been highlighted and are ready for fresh sheet metal. Mark has fabricated up a simple rolling cart to mount the chassis/body on, so he can roll it down to the sheet metal fab shop. In a couple weeks, we'll get some "after" photos posted.

-Chris H.