skip to main |
skip to sidebar
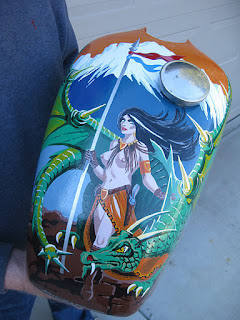
A change of pace! My son Chris wanted an interesting painting on the fuel tank for his wee Kawasaki Bushmaster motorcycle. Chris rebuilds and restores these little smokers and has a small herd of them---Honda, Hodaka, Yamaha, Kawasaki and a couple whose names I can neither spell nor pronounce--a dozen or so all told.  I did half a dozen pages of sketches of dragons and scarcely clothed women, y'know, to get into the mood of boobs and dragons. This is the final work-up layout--done in ball-point pen--for the painting. I knew it was going to be interesting when I transferred this from the two dimensional sketch to the three dimensional tank, but I had to start somewhere.
 So here they are, the dangerous-looking woman with lance, pistol and boobs, and the even more formidable-looking dragon with teeth, tail, claws and a ton of pointy thingies all over it.
 I wrapped the background and the dragon's wings around the tank, and since I know dragons pretty well, I knew this meant Mr D was about to launch and eliminate an adversary with teeth and flame, waiting only the removal of his mistress's hand.
 Yup, that's me, with the evidence in hand. By the way, the paint used is ONE-SHOT sign writers oil base enamel. There are a lot of brush strokes on the tank, necessary to get all those scales and claws and boobs and stuff just right. Someone suggested it should be clear-coated for protection. Chris vetoed that, since he wanted it to look hand painted and not air brushed! He and I both know that One-Shot is a very tough enamel that holds its color extremely well. Enjoy.
This is one of 14 technical books I've written [and illustrated] on vintage Saabs. I've also written and illustrated 3 books on the 124 Fiat series, but that's another story. I've been sorting automotive electrical systems for 40 years or so but you might be surprised to know how often I refer to this 130 page book myself! I went to a lot of time and effort to write the book in the first place, and it is by far the BEST you can lay your hands on if you are trying to figure out something electrical in a Saab 95, 96 or Sonett.  I used the schematic of the Sonett III headlight relay system for the back ground on the book's cover. I repeated it in the text and I take you through how it works, in great detail, like I do for the dozens of other schematics in the book.
 I show you 13 different switches in the book, including how they are internally wired, and then describe in the text how they work. I also cover the fuse box, different relays, ballast resistors, coils, ignition switches, instrument panel wiring and a ton more.
 I don't have x-ray vision, so I take stuff apart to see how it works. This is a typical Saab 95, 96 and Sonett headlight relay. I describe in detail how it works and better yet, how to repair it when it decides to take a vacation on you. You won't find that kind of help in ANY other repair manual, including the old Saab Factory manuals!
 This is typical of how I show you the way something works in these cars. This is the primary wiring--the under-the-bonnet stuff--in a Sonett III. The Sonett V4 and the 95/96 cars are different so there are two more drawings like this for those cars. The accompanying text takes you by the pinkie and leads you through each one, wire by wire.
My son Mark sells this 130 pager through his business, Ashcraft's Vintage V4 Parts. Give him a growl at 541-779-0731. It ain't free, but it will show you how all those mysterious electrons zing around in your Saab, and it will save you hours of head scratching. Best of all--YOU might be able to chase those electrical gremlins out, and keep your wee Troll out of a hundred dollar an hour repair shop!
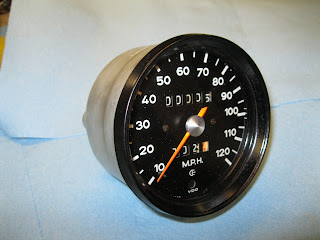
I've just finished rebuilding four speedometers for Saab, and, surprisingly enough, for Volkswagen owners [!]. All these instruments were built by VDO, of course, and while they have similar "innards", there are important differences. So I have to use different techniques on each one. This one [above] is from a Saab Sonett III. Just visible is the SAAB logo, right under the trip register.
 This one is from a "Type 3" VW. You know, the Squareback and Fastback models.
 This VDO unit is from a VW Beetle, when VW was trying to convince buyers the car would go 90 mph. The first USA Beetle speedos only were calibrated to 80.
  This one is from a Porsche 914. These VW-Porsche speedos caused me to design and build a whole NEW raft of special wee tools, but that's the only way to do it right. I also do a speed vs mph calibration on every speedometer and give the owner a complete rebuild data sheet.So why am I doing VW-Porsche speedometers? Well, like a whole lot of people over 60, I have owned a number of those cars. Lessee....hmmm....3 Beetles, a Westphalia bus and a '61 Super 90 Porsche coupe. Quite a number of Euro cars of the 1950's, 60's and 70's used the VDO instruments and I figured VDO didn't reinvent the wheel for every manufacturer they sold instruments to. Once I got into the speedos a while back, my suspicions were confirmed. See--I can have even more fun with speedometers now--HA!
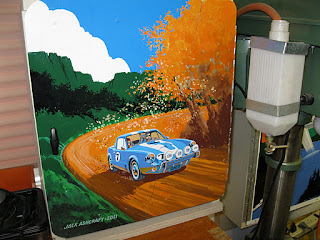
Lots of guys have shops and that's great. Mine is heated, has plenty of light, a padded stool, a good radio....and AUTO ART! I painted these scenes, using One-Shot sign enamel, on galvanized steel sheet, about 20 or 22 gauge.  These are all paintings of my cars. Above--a very fast '69 Sonett V4 rally car. It had about 130 horsepower and about a million candlepower of light out front. Nice to see where you are going, at 100 mph in the middle of the night! The sign forms the door of a 10" deep cabinet next to my shop drill press.
 This was my first car--a '37 Ford slantback. It had the flathead V8 engine, which produced 85 horsepower on a good day. You can see the reflection of the old South Dakota farmhouse where we lived when I bought this old Ford. Cost me $65, at Rozum Ford, in Mitchell, SD. This painting is mounted on one of three cabinet doors over my workbench.
 This is my all time favorite car, of the 70 or so I've owned, a '60 Jaguar 3.8 MK 2. It had a 4 speed box, plus a Laycock de Normanville overdrive, and a ton of walnut and leather inside. It would cruise happily at 100 mph, in quiet comfort. A real "gentleman's express". Quite!
  Between my big drill press [left] and my lathe [right] is a 4" deep cabinet with this painting on its door, of the homebuilt, composite POLLIWAGEN 2-place airplane I built. Typical Oregon scenery is the backdrop for this slick little bird.
Want some shop art with YOUR car in it? Give me a growl and we'll chat about it.


