Wednesday, December 1, 2010

NEW BOOK ON SAAB V4

I haven't been spending so much time dancing [Kathy and I are ballroom dancers] that I couldn't write a new book. Over the years a TON of Saab owners have told me they want to "restore my old Saab". I know the pause that comes after that will be ended with the owner admitting that he/she have no idea where to start or what all is involved. This 60 page book--based on at least 40 years of repair and restoration experience--is meant to answer their questions.

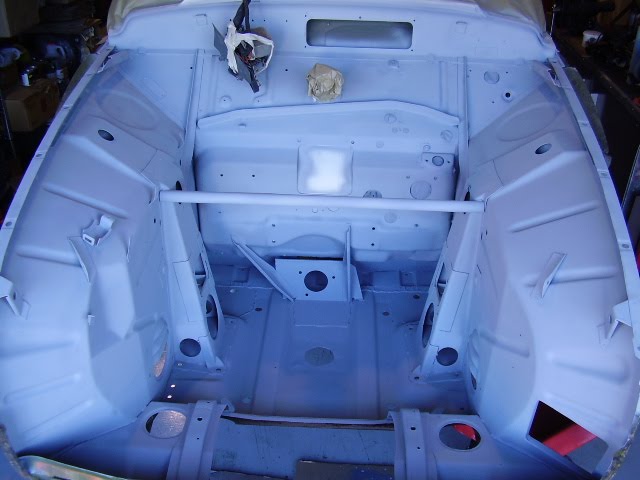
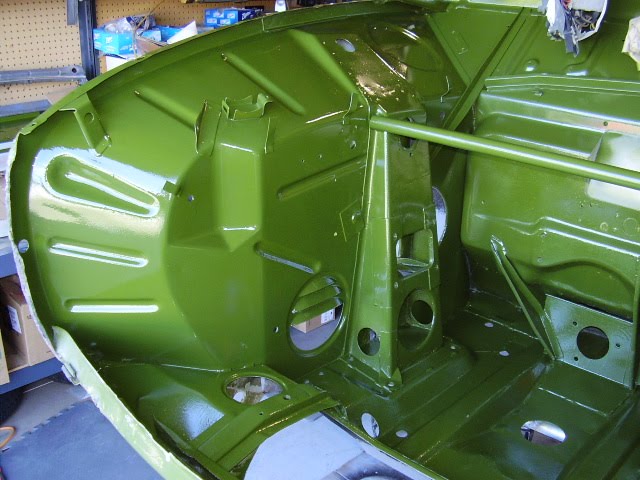
Starting at the grille and ending at the tail lamps, the book shows--in a logical sequence--system by system and part by part, how to proceed through this extensive project.

The book is NOT A SERVICE MANUAL, though there are some HOW-TO chapters that I haven't covered in the other 16 Saab repair and maintenance books that I have written. And as always, there are a lot of my cartoons and illustrations and diagrams included.

The book covers restoration of the Sonett II and V4 and Sonett III, as well as the Saab 95 and 96 cars. There is a chapter about how to get that pesky hood/fenders assembly on and off the Sonett III, and another on how to rebuild that floppy emergency brake handle. There is a lot of data you won't find in any Saab repair manual--except one of mine--and a chapter on special tools you can build, that you will need for this project.

I ask the owner of this to-be-restored car to be realistic about what parts of the restoration he/she can complete themselves, and what parts should be assigned to a professional. And why. I also offer a bit of advice on how to select the pro to do the work.


By the time the odometer reads something like this one, the mechanical restoration is probably on your mind. This is an entertaining, very informative guide for you that will help you decide if you want to get the restoration under way, and when you do, how to go about it. It is also cheap at twenty five bucks plus S&H. I wish I'd had this book when I did my first full restoration!

Sunday, October 17, 2010

Saab 95 Restoration Progress: Trunk and Fuel Tank Floors

Trunk floors tend to suffer from demon rust on most Sonetts, 96s, and 95s, and this restoration project is no exception.

Fresh sheet metal in the fuel tank opening:


New trunk floor sheet metal:


Fuel tank floor in primer:


Trunk floor and surrounding area in primer:


Bottom of fuel tank floor in primer:


Trunk floor painted:

Saturday, October 16, 2010

Saab 95 Restoration Progress: Floors and Footwell

Much of the front floor and footwell area needed new sheetmetal in the Saab 95 Mark is working on. Here are some quick shots during the process.

Fresh sheet metal welded in place:


Sheet metal is fabbed up with integral bends to match up with stock pieces:


New front toeboards, featuring an access opening for the rear transmission mount. Mark and Jack have created a new rear trans mount that can be removed from inside the vehicle, instead of having to pull the engine/trans to remove it from inside the engine bay:


Entire area in primer:


Freshly painted:


Another view of freshly painted front floor sheet metal:

Saab 95 Restoration Progress: Engine Bay

During my last trip up to Oregon a couple weeks ago, I stopped by the shop and visited with Mark. He;s thick in the middle of two restorations, one for this Saab 95 Wagon, and one for a Sonett III. The Wagon has proven particularly "fun" as there was extensive body rot throughout, as documented here.

Mark has made great progress on this car, so I wanted to do a quick scrapbook of some of his work, starting in the engine bay.

Main engine bay cleaned up and primered:


And in paint, using the original paint code for this year:


Passenger side inner fender in primer:


And in body color:


Driver side in primer:


Driver side in paint:


One thing to notice in the above tow pictures is the rectangular access opening at the front of the inner fender. This wasn't stock. the owner of this particular car has thoughts of installing air conditioning, and this opening makes it possible to actually reach the AC belt tensioning device. Here are some pics of they created the opening.

The opening from inside the engine bay:


From inside the wheel well. An access panel was also built that will be easily removed with a few small bolts:

Thursday, September 16, 2010

HOT OFF THE PRESS!

Now you really can "wrap your ass in fiberglass" though my wife says Spandex works better!This is me and my latest HOW-TO book--one of 15 on Saab mechanicals--that just came from the printers.

This tome runs to 112 pages and has 286 illustrations, telling YOU--step-by-step--how to work with fiberglass composites. I show you how to repair virtually everything on Sonetts, how to build air dams, wings, NACA ducts, air scoops, and a TON more!


Here are a couple of pages out of the book to give you an idea about how it is laid out. Illustrations go next to the instructions, which are put in a logical sequence. I tell you how to use polyester, vinyl ester, and epoxy resins, along with a variety of fiberglass cloth materials, including graphite [also called carbon fiber] and Kevlar, along with normal "E" cloth, the cloth used in Sonett bodies. The best part is this: I show you how to do it--safely and easily--right in your own work shop!

I show you a very wide range of repair and construction projects. One of the more ambitious is how to convert the busted back window of a Sonett II or V4 to a three window hatch, as shown here. "It is not original!" Yup, you're right. But those deep draw rear windows are now made of a product called unobtanium, so no matter what you do, the result ain't gonna be "original". This is a pretty good solution, it looks pretty good, and I show you how to do it step-by-step.
The new FIBERGLASS GUIDE books are sitting here, ready to ship. Call me at 541-499-0246 or email me at jacksonashcraft@gmail.com and I can tell you more about 'em. You'll get more than your money's worth at $69.00 plus postage. Get ready...to WRAP YER ASS IN FIBERGLASS!


SPEEDMEISTER STRIKES AGAIN!

VDO speedometers, like others of its ilk, are fairly delicate little buggers. I treat 'em like they are a big watch, and have built a number of special tools to EASE 'em apart and EASE 'em back together again. I use the dial indicator to get measurements BEFORE I take the speedo gubbins apart--I like to put them back together at the factory settings.[Ignore the pliers].

The red tools are the special ones. At the top, the press to press the main odometer shaft back into place after the bad odo gear on that shaft has been changed. Immediately below, to the left, the puller for the speedo needle. To its right, a puller for the wee brass gear on the main odo shaft. Two mount fixtures are below, and I use them to hold the speedo frame firmly in place while I change out the parts.

This is the back section of a Sonett III speedometer. The round "drum" in the center is a very small permanent magnet that makes the speedo needle operate. To the left of the drum are a set of plastic gears that operate the odometer assembly number wheels. I check all this stuff and replace bad parts, and then lube all the moving parts.

The pointer indicates the main odo shaft. On the table to the right is a new odo drive gear that I am about to install. This little sucker fits to the extreme right end of the TOP number register. I have already removed the bad gear.

This is the wee press that I built to press the main odo shaft back into place. I press the shaft into place so it has the same clearances on each end as it did before I took it apart. Note that the new odo drive gear [the white one on the right end of the register] is in place.

I've adjusted and lubed all the internals and its going back together. Note the use of one of the [red] stabilizing stands. Just a matter of putting it all into the case, cleaning the glass face, and snapping on the chrome retaining ring.
As I said in an earlier blog, VDO speedometers are no big mystery to me. If you have one that only "odo's" when it feels like it, it may be just like the one you see in these pictures. I can change the bad stuff inside, clean, lube and adjust the rest and PRESTO! A speedo good for another 100,000 miles. AND....I can do it for a whole lot less than the "regular" speedo shops charge. Give me a growl and lets talk!

Friday, September 10, 2010

SPEAKING SPEEDOMETER

VDO speedometers are pretty trouble-free, for the most part. However the ODOMETER portion gets tired after while and in order put them into good fettle once again, they have to come apart. This isn't a real easy thing to do, assuming you don't want that nice chrome bezel all boogered up.

This is the anti-booger tool that I designed and built. It clamps the speedo just right, and the handle [with a wedge tool attached to the speedo end] peels the chrome bezel off, slick as a whistle, without damaging the bezel. SLICK!

I have to take off the speedo needle in order to get the number face off, in order to take the speedo apart to get to the odometer bits that go South. The needle is fragile. I'm using a little puller tool that I built--to pull the needle without doing a booger job on it, either. Gentle is the name of the game when working with speedometers!

Voila! the face is off and I have the front half of the speedo in my left hand. I've set aside the rear portion of the unit. I'm pointing to a plastic gear that is in the chain of gears that drives the odometer [and the trip meter as well]. Unfortunately, this easy-to-get-to plastic gear is NOT the one that gives up the ship in these speedometers. ARRRGGGHHH!

See that little brass gear? That little sucker isn't the one that goes tango uniform, either. But it has to be pulled to get to the bad one. The bad one is the GREY pot metal gear just to the right of the numbers register that is on the bottom in this photo, between the last register and the speedo frame. I built the little puller I'm holding. That little sucker pulls that wee brass gear quite nicely. THEN...I can take the numbers drums out, get the bad Grey gear [called an "advancer"], replace it and chuck it all back together. Fun times!

I hate to re-create wheels. So I spent time drawing [in rather a lot of detail] exploded views of all the gubbins in these speedometers. Makes the process of disassembly, cleaning, repair, oiling and reassembly a whole lot easier. So if your odometer refuses to odo, I can make it all better once again, because, see...I speak speedometer...HA!
I've been repairing these VDO speedos for some years now. I don't see them as some sort of mysterious device that can only be repaired after a lot of money has changed hands. Give me a shout--let's talk about what it takes to fix the VDO speedo in your wee Saab.

Wednesday, September 1, 2010

GIVE ME A BRAKE

I regularly have a need to bend pieces of sheet steel or aluminum, or strap of either persuasion. A small brake was in order, so....I built one. The component parts are shown here.


There are three pieces of 1.75" x 1.75" x 0.200" steel angle, some 0.200" thick pieces of plate [at the ends of two of the angles], a couple of 0.50" diameter "J" bolts, a 6.0" piece of 0.75" O.D. pipe, and two 7/16" bolts with nylock nuts.

Here it is, assembled, with a piece of 18 gauge sheet steel set in place, ready to be bent. [The light colored piece in the middle of the brake is the steel to be bent]. The aft, LOWER angle is mounted in my bench vise. The aft UPPER angle holds the piece to be bent into place by tightening the nuts on the welded-in-place bolts on either end. So now it is just a matter....

...of lifting the handle to bend the piece of steel sheet. The brake will accept metal up to 12.5" wide,
and will easily bend aluminum sheet up to 0.125" thick and steel sheet up to 16 gauge. It will also bend steel strap up to 0.125" thick and 2.0" wide.

The angle of the photo isn't great, but it does show the piece of 18 gauge bent to about 45 degrees. At this point, I simply loosen the two nuts on the aft TOP angle and slide the bent piece forward, out of the brake. As they say in the translated instructions, "Welding, some drilling and cut is to be required." Followed by three equally well translated paragraphs on how not to kill yourself with your welder, your drill press or your hack saw.
At any rate, this is an easy to build, and very useful little tool that takes up very little storage space for the 98% of the time you won't need it. And it works like a champ for that 2% of the time when you DO need it.

Saturday, August 28, 2010

FREEWHEEL FOIBLE FIXED

You are looking at the front of another customer's Saab V4 transmission, mounted in my factory transmission press. The gear with the large teeth is the pinion gear. Above and to the left of that gear is a screwed-up input shaft hub. Inside that hub is the freewheel unit. The pulley-looking thing sticking out of the hub is whats called a "dog clutch" gear. Someone with probably good intentions had welded on half washers to hold the dog clutch engaged, rendering the freewheel inoperative, or as we call it,"neutered".

The problem with this neutering method is that it throws the main shaft out of balance, and makes it impossible to ever revert to freewheeling again. This is really not a good way to neuter the freewheel.

Here is the main shaft after I removed it from the transmission. You can clearly see the dog clutch piece dangling from the freewheel hub of the main shaft. Hmmmm.....what to do to save the expensive main shaft and dog clutch....hmmmm....

I put the sucker in my lathe and began to cut off the half washers, by cutting through the welds. This is the cutter set-up on the carriage fixture on my lathe. I have made the first cut in this picture.

This is the second and final lathe set-up. The cut has gone through the welds and is into the half washers. My hope--at this point--was that the welding had not screwed up the freewheel hub. If it had, the mainshaft was junk.

VOILA! The cut is completed. The owner got lucky. The main shaft, the dog clutch and even the freewheel parts inside the hub were all still good. All I had to do from this point was to use the lathe cutter to clean up the end of the freewheel hub.
The point of this? There is a right way and many wrong ways to do something. This was one of the wrong ways that I managed to correct. I WILL neuter the freewheel, but do it the right way, so nothing is out of balance, and should the owner [or subsequent owner] ever get soft in the head and want to make the freewheel function again, he [or they] can do so.

Friday, August 20, 2010

BUSHED, BABY!

Bosch distributors, as used in Saabs with V4 engines, get old, tired and sloppy. [I've known some mechanics like that, too...]. Bosch didn't bother to put bushings at the BOTTOM of the distributor body, so over time and a lot of miles, the aluminum distributor body gets "hogged out". When that happens, the ignition point gap varies as the engine runs, the dwell changes, and the basic engine timing changes. And the engine runs like crap.

Here is my setup in that pretty blue lathe again, to machine out the bottom of the distributor body so I can install a bushing. I built a precision tool [mounted in the lathe chuck in this photo] to hold the distributor body on its exact center line. The precision lathe bit [shown in the steady chuck at the bottom of the photo] does not move. The chuck in the lathe rotates the distributor body as the steady chuck advances the bit through the body, machining the correct diameter hole as it goes.

Here I am using a larger bit in my big, commercial drill press to do a light chamfer in the freshly machined hole. This will allow the bushing to start into the distributor body easier.

I use a bolt that is machined to JUST slightly smaller than the diameter of the new bushing to guide the bushing into the distributor body. The bolt is long enough to fit through the bushing on the TOP end of the distributor body, so the bolt forms a perfect guide as I press the bushing into place. The bushing is an interference [plus] fit into the distributor body.

I use an adjustable reamer to open up the bushing to an inside diameter equal to the diameter of the distributor lower shaft, plus 0.003". I always HAND ream, and never attempt to speed up the reaming process as some might by putting the reamer in a hand drill. I ream a little, then test fit the shaft, and repeat the process until it is just right. When I'm finished with one of these Bosch distributors, it doesn't know it isn't young, vibrant and ready to go for thousands of miles once again.