skip to main |
skip to sidebar
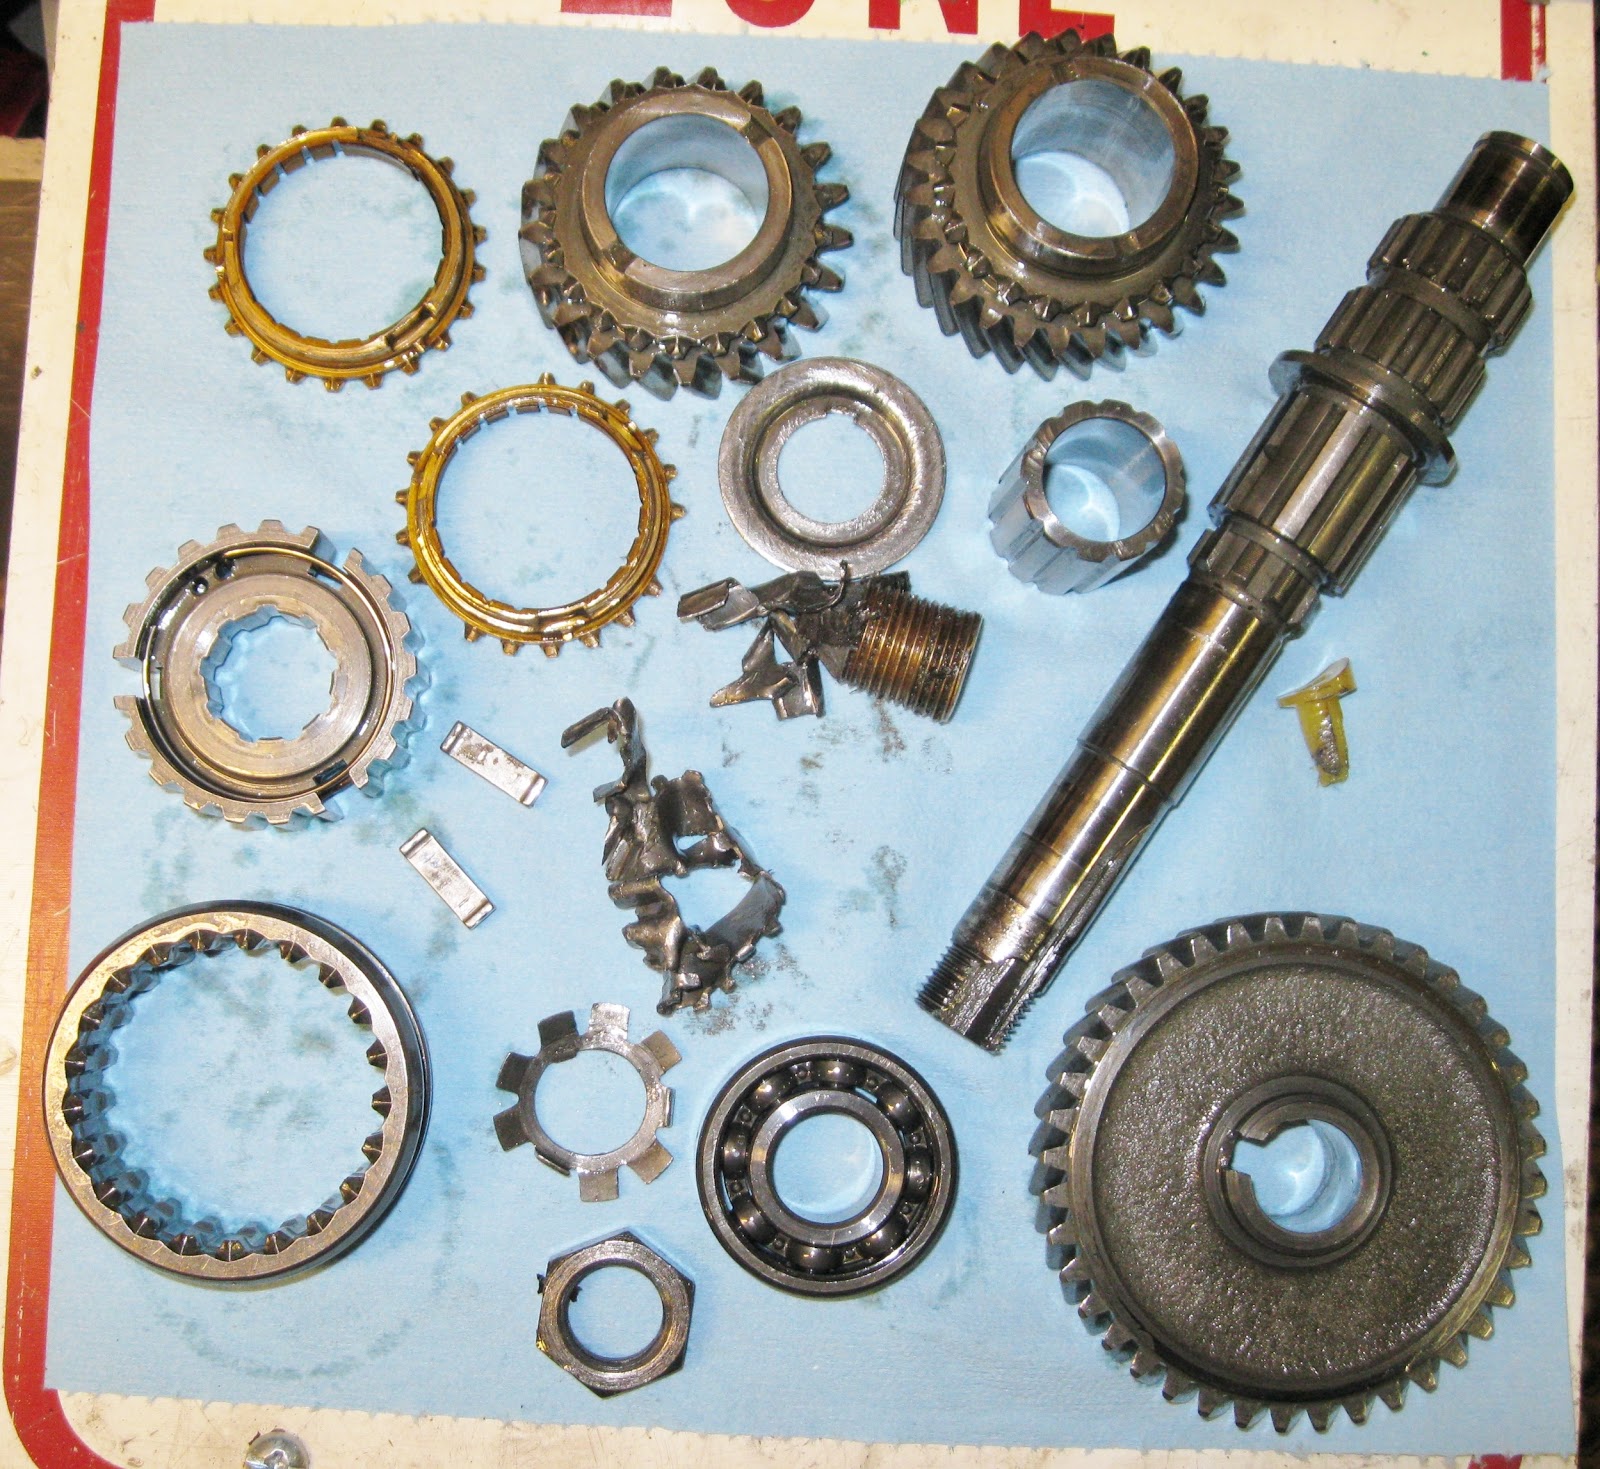
These are a few of the buggered up transmission parts that I found in the bottom of a transmission I just rebuilt for a customer. This was strange because I usually don't find this sort of damage. It was also strange because the transmission was CLEAN inside. Clearly, someone had been into it recently and had screwed up the job. Also--parts were missing and every case bolt was WAY too tight, as if it had been put together using an impact wrench, which is NOT a good idea. ALL the bolts/nuts in these Saab transaxles must be torqued to the specs provided by Saab in their factory service manual.

Once I had the bell housing off, it was clear what had happened. The nut at the end of the countershaft [shown] had come loose. The shaft then "floated" and the result was that every part shown--3 gears, the shaft, low and second synchronizer rings, the synchronizer hub and a bunch of smaller parts--were all busted up and had to be replaced. All because the moron who was into the transmission last did not correctly torque the nut at the end of the countershaft. OY!
Well, here is the reassembled gearbox. All countershaft-related damaged parts--as well as others damaged because of the countershaft problem--have been replaced. Note that the 'box is in my factory transmission jig. Using this jig--and the 20-odd factory tools that go with it--is the ONLY way to be sure that an overhaul of one of these transaxles is done correctly.
There are a number of internal adjustments that MUST be done correctly--some with correct thickness shims, some with feeler gauges, and this one with a dial indicator set up--to insure long life and reliability of the transaxle.
Here is the finished transaxle. I always specify the use of synthetic transmission oil--AMSOIL being the BEST, in my opinion--so I use an anerobic sealer, which is not attacked by synthetic oils--for all case mating surfaces, and on both sides of the rear cover and top cover gaskets.
Another view of the completed transaxle. Note that there is NO freewheel control lever. This unit has been "neutered" so the freewheel--a carry-over from two-stroke engine days--does not function. It is very easy for the V4 engine--which actualy has TORQUE [compared to the two stroke] to damage the freewheel unit. It is worth noting that I DO NOT weld internal parts to neuter the freewheel! At any time in the future, the freewheel system COULD--if the owner got soft in the head--be put back into use.
Call it "Murph'y Law" or BumLuck or any other saying regarding mechanical difficulties, but recently I have encountered not one, but TWO problems with V4 Ford/Saab cylinder heads for high performance engines.
Take a look at my exploded view drawing above. Note the exhaust valve hard valve SEAT. Today's unleaded fuel will cause early exhaust valve failure without hardened exhaust valves and valve seats. So far so good...
I install larger diameter valves and of course larger exhaust valve hard seats. I've rebuilt dozens of V4 engines with these big valve cylinder heads, with no problems. Still, so far so good.
A couple of weeks ago, my machinist found a "pocket"--a casting flaw--in a cylinder head, where he had machined the head to accept a larger diameter hard valve seat. Result? the head was instant junk. Kauput.
This week, another bad cylinder head....
This head [shown above, before installation] was on an engine installed in a customer's Sonett III, and I discovered--during the 500 mile drive-off--that the right side exhaust pipe was putting out WHITE smoke. Not a lot at first, but it got worse as the end of the 500 miles approached, it was obvious that it was not going to get better. A compression check showed equal compression in all four cylinders and a vacuum gauge check showed steady--and correct--manifold vacuum for this elevation [1350 feet above sea level].
I retorque the cylinder heads and intake manifold to factory spec's 3 times during the 500 mile drive-off runs. The drive-off period allow correction of [usually] small glitches that always appear--in any number of areas--when a car has undergone a full restoration.
I removed the carburetor, intake manifold and right hand cylinder head. Close examination of the head and intake manifold gaskets showed no damage to either, but it was clear that there was a big problem in the forward [No. 1] combustion chamber. The exhaust valve was VERY white, indicating a lot of heat, and there was a bit of fluid around the intake valve. I had certainly found the area of the problem.
NOTE: White smoke in the exhaust means coolant is being sucked into the combustion chamber. Blue smoke means OIL is being sucked into the combustion chamber, either past the valve guides or past the piston rings, or both. Black smoke means the engine carburetion is WAY too RICH. Smoke of ANY kind from the exhaust means further investigation is needed, and soon.
The reason for the problem was a crack in the cylinder head at the intake valve seat, where apparently the machining of the head to accept a larger valve had either come close to another pocket in the head casting, or was simply because after machining, the wall thickness between the seat area and the water jacket was thin enough that it cracked with the heat of combustion. NOTE: both head were magnefluxed after machining and showed NO cracks.
Well...shit happens. Particularly when you are trying to get a quart's worth of work out of, essentially, a pint pot. My modified V4 engines produce 115 to 140 horsepower, depending on how thick the customer's wallet is, but the more power you produce
the more possible are the unexpected results. Usually....everything is just fine and the customer gets a really nice engine that will be as reliable as a factory engine.
But sometimes...shit happens. That's why we ALWAYS do a 500 mile drive-off before we deliver a restored Saab to it's owner, and why we insist that the owner of one of our reconditioned V4 engines follow the instructions we include with the engine when we ship it to him.
First--my apologies for less than wonderful photos. A BLACK engine is not the greatest for award-winning photography...This is the completed Ford/Saab V4 high performance engine, ready to go to the owner, to "wake up" a Saab 96. It will produce 110-115 horsepower--quite a step up from the original 73...
The car in the background is my '37 FIAT Topolino, "MR T".
Front view. Note the timing cover--modified to give room for a radiator with electric fans. Behind the cover are special timing gears--steel gears for crankshaft and balance shaft, aluminum gear for the camshaft. The cam itself is a regrind to Iskenderian F4 specs. Atop the engine is a Weber 32/36 DGV-5A carburetor and air cleaner.
Right front corner. The new oil filter and water pump are visible. Not visible--big valve cylinder heads and fully balanced crankshaft and associated parts. I reconditioned and lightened the rocker arms as well. Note the engine lift [in red], an item I built 40+ years ago. Good tools last a very long time...
Arse end. Note the reconditioned distributor and high performance Magnecore plug wires. Note also the light flywheel and matched pressure plate. The blue paint indicates the balance-match [pressure plate to flywheel] point. The bits of green tape seen here and there are to cover coolant pipes, etc, as the engine is to be shipped to it's owner in another state. I send along a compete listing of all the parts and all the work done on these engines [9 pages long on this one...] plus a short "manual" on doing the necessary re-torques and adjustments as the engine is driven in the owner's car.