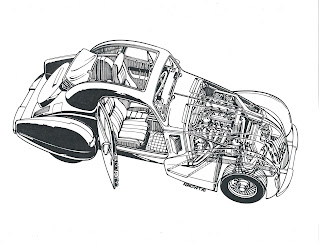
Every once in a while it is good to "show off", assuming you have something to show. One of my evils is doing "phantom" drawings. You know, those drawings done as though the outer skin is clear plastic. The drawing above was my FIRST phantom, done in the winter of 1962. [Yeah, I know...back when dinosaurs roamed the earth...]
John Callies' FIAT Topolino with a 303 CID Pontiac V8 engine was the first phantom drawing that I got paid for doing. John used the car--and my art work--to promote the various products that he marketed. This was one scary little bomb to drive or ride in!
Another FIAT, this one a 1937 model, my own car, MR T. Mechanicals were almost all FIAT, including the 2-litre twin cam engine, 5 speed trans, disc brakes, etc. It even had some SAAB parts! I built new fiberglass rear fenders, spare tire cover, the hood/front fenders assembly, and some other stuff.
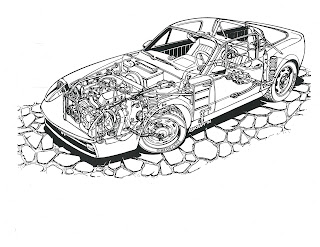
HA! Another one I got paid for. This is a kit car, built by a small company in Oklahoma City, between tornadoes, one assumes. It has a 5-litre Ford V8 engine, disc brakes, a fuel cell, and a ton of other goodies.
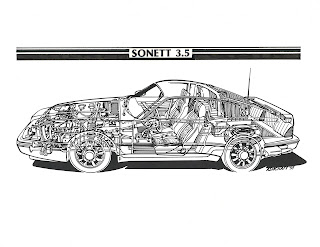
Well, of course I did phantom drawings of SAABS! Above, a very special Sonett III with all new fiberglass up front, and a complete re-style of the arse end. Engine is a 1.7 litre V4 Ford of about 120 bhp, and yup, those ARE Ronal wheels.
This is FAST FREDDY, my '68 Sonett V4 autocross and hill climb racer. Freddy's V4 engine produced right at 150 bhp and a winter diet got his weight down to 1490 pounds, ready to race. Competitors hated to see me arrive in Freddy. In 5 years of autocross racing, I can count the number of times I was beaten in my class, on one hand.
Another highly successful race car, believe it or not. My son Chris and I built TITO, an '86 Yugo, for Pacific Northwest autocross racing. The engine was a 1.5 litre FIAT X1/9 engine producing the better part of 140 bhp. This was another car that the competitors hated to see arrive at the race courses.
Here is another drawing done for a kit car manufacturer. It boasted a fiberglass body and square steel "space" frame, and was set up for VW, Porsche or Corvair power. And yup, I got paid for this one, too.
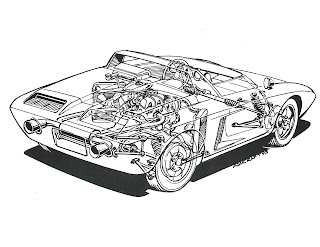
I did this drawing of Ford's Mustang One for an article in a magazine. Note the twin radiators, one on each side of the engine. A pity Saab wouldn't consider producing a roadster...Ford's contract builders, Troutman and Barnes, in Southern California, who produced half a dozen of these cars, had done all the work already. When Ford decided NOT to produce the Mustang One, Saab could have had it for a song.
I got serious about phantom drawings with this one, completed when I was in my final semester of Automotive Design at Art Center College of Design in L.A. in 1975. We seniors were doing a design project for General Motors for a proposed new LaSalle.
Airplanes are fun to draw. This one is a Bradley Aerobat. Bradley Aerospace was a very small company in Chico, California, building these little aluminum buggers as kits. Modified VW engines were the normal powerplant used. I completed a multi-page, step-by-step assembly manual for this little bird.
My pay for doing an assembly manual for the Polliwagen was a complete Polliwagen KIT! This was a side-by-side, two place composite bird that could be ordered with retractable landing gear, fixed, or full flying tail, and could be configured for a VW engine, or larger powerplants up to and including the 150 bhp Lycoming O-320. It was fun to fly and was a genuine 200 mph bird with the larger engine.
All of the original art for these drawings was done about 16" x 24" size, in order to get the level of detail you see. I always use a LOT of photographs to get the details correct, and when possible, go to the factory so I can really see--and photograph-- the "bare bones" of the car or airplane. It is not in my nature to guess at anything.
I hope you have enjoyed my bit of "showing off!"
Wednesday, January 13, 2016
SAAB 95/96/97 BACK UP LIGHT SWITCHES
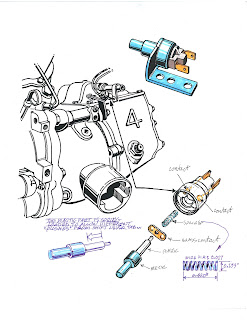
These are the [made of unobtainium] back up light switches for Saab 95/96/97 cars that I recondition. The drawing above shows where the switch is located on the Saab transaxle, and the internals of the switch. Nothing much to them...right? Well, yes and no. Because of the nasty environment where they "live", they get really grubby and corroded inside. The trick is to get them apart without destroying them. AH! as the Bard of Avon said, "There's the rub!"
Here are 16 switches. At the bottom, one switch disassembled. Above, are 15 switches that I have reconditioned and tested. As I said, getting them apart without destroying the switch is the trick, and it is a bitch....unless...
...you happen to have my special tools. Top center--the tool that holds the switch so you can use the bottom tool to UN-crimp the steel body of the switch WITHOUT breaking the plastic switch body. The same tool is used to RE-crimp the steel body of the switch. The little red tool is a special holder for trimming tiny brass screws that I sometimes have to use to hold a new connector when one of the electrical connector tabs are broken off.
If you are wondering where to get these tools....they're made of unobtainium, too. Just send me you dead switch and I'll recondition it. When I'm done with it, it will look like one of the 15 switches in the center photo. Good stuff, huh?
Subscribe to:
Posts (Atom)


