skip to main |
skip to sidebar
Now you really can "wrap your ass in fiberglass" though my wife says Spandex works better!This is me and my latest HOW-TO book--one of 15 on Saab mechanicals--that just came from the printers. This tome runs to 112 pages and has 286 illustrations, telling YOU--step-by-step--how to work with fiberglass composites. I show you how to repair virtually everything on Sonetts, how to build air dams, wings, NACA ducts, air scoops, and a TON more!
 Here are a couple of pages out of the book to give you an idea about how it is laid out. Illustrations go next to the instructions, which are put in a logical sequence. I tell you how to use polyester, vinyl ester, and epoxy resins, along with a variety of fiberglass cloth materials, including graphite [also called carbon fiber] and Kevlar, along with normal "E" cloth, the cloth used in Sonett bodies. The best part is this: I show you how to do it--safely and easily--right in your own work shop!
 I show you a very wide range of repair and construction projects. One of the more ambitious is how to convert the busted back window of a Sonett II or V4 to a three window hatch, as shown here. "It is not original!" Yup, you're right. But those deep draw rear windows are now made of a product called unobtanium, so no matter what you do, the result ain't gonna be "original". This is a pretty good solution, it looks pretty good, and I show you how to do it step-by-step.The new FIBERGLASS GUIDE books are sitting here, ready to ship. Call me at 541-499-0246 or email me at jacksonashcraft@gmail.com and I can tell you more about 'em. You'll get more than your money's worth at $69.00 plus postage. Get ready...to WRAP YER ASS IN FIBERGLASS!
VDO speedometers, like others of its ilk, are fairly delicate little buggers. I treat 'em like they are a big watch, and have built a number of special tools to EASE 'em apart and EASE 'em back together again. I use the dial indicator to get measurements BEFORE I take the speedo gubbins apart--I like to put them back together at the factory settings.[Ignore the pliers].
 The red tools are the special ones. At the top, the press to press the main odometer shaft back into place after the bad odo gear on that shaft has been changed. Immediately below, to the left, the puller for the speedo needle. To its right, a puller for the wee brass gear on the main odo shaft. Two mount fixtures are below, and I use them to hold the speedo frame firmly in place while I change out the parts.
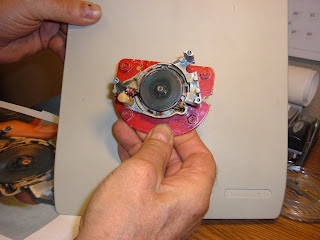 This is the back section of a Sonett III speedometer. The round "drum" in the center is a very small permanent magnet that makes the speedo needle operate. To the left of the drum are a set of plastic gears that operate the odometer assembly number wheels. I check all this stuff and replace bad parts, and then lube all the moving parts.
 The pointer indicates the main odo shaft. On the table to the right is a new odo drive gear that I am about to install. This little sucker fits to the extreme right end of the TOP number register. I have already removed the bad gear.
 This is the wee press that I built to press the main odo shaft back into place. I press the shaft into place so it has the same clearances on each end as it did before I took it apart. Note that the new odo drive gear [the white one on the right end of the register] is in place.
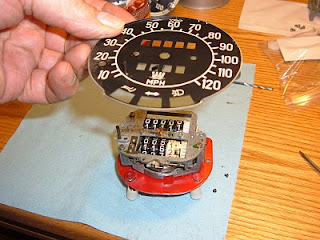 I've adjusted and lubed all the internals and its going back together. Note the use of one of the [red] stabilizing stands. Just a matter of putting it all into the case, cleaning the glass face, and snapping on the chrome retaining ring.
As I said in an earlier blog, VDO speedometers are no big mystery to me. If you have one that only "odo's" when it feels like it, it may be just like the one you see in these pictures. I can change the bad stuff inside, clean, lube and adjust the rest and PRESTO! A speedo good for another 100,000 miles. AND....I can do it for a whole lot less than the "regular" speedo shops charge. Give me a growl and lets talk!
VDO speedometers are pretty trouble-free, for the most part. However the ODOMETER portion gets tired after while and in order put them into good fettle once again, they have to come apart. This isn't a real easy thing to do, assuming you don't want that nice chrome bezel all boogered up. This is the anti-booger tool that I designed and built. It clamps the speedo just right, and the handle [with a wedge tool attached to the speedo end] peels the chrome bezel off, slick as a whistle, without damaging the bezel. SLICK!
 I have to take off the speedo needle in order to get the number face off, in order to take the speedo apart to get to the odometer bits that go South. The needle is fragile. I'm using a little puller tool that I built--to pull the needle without doing a booger job on it, either. Gentle is the name of the game when working with speedometers!
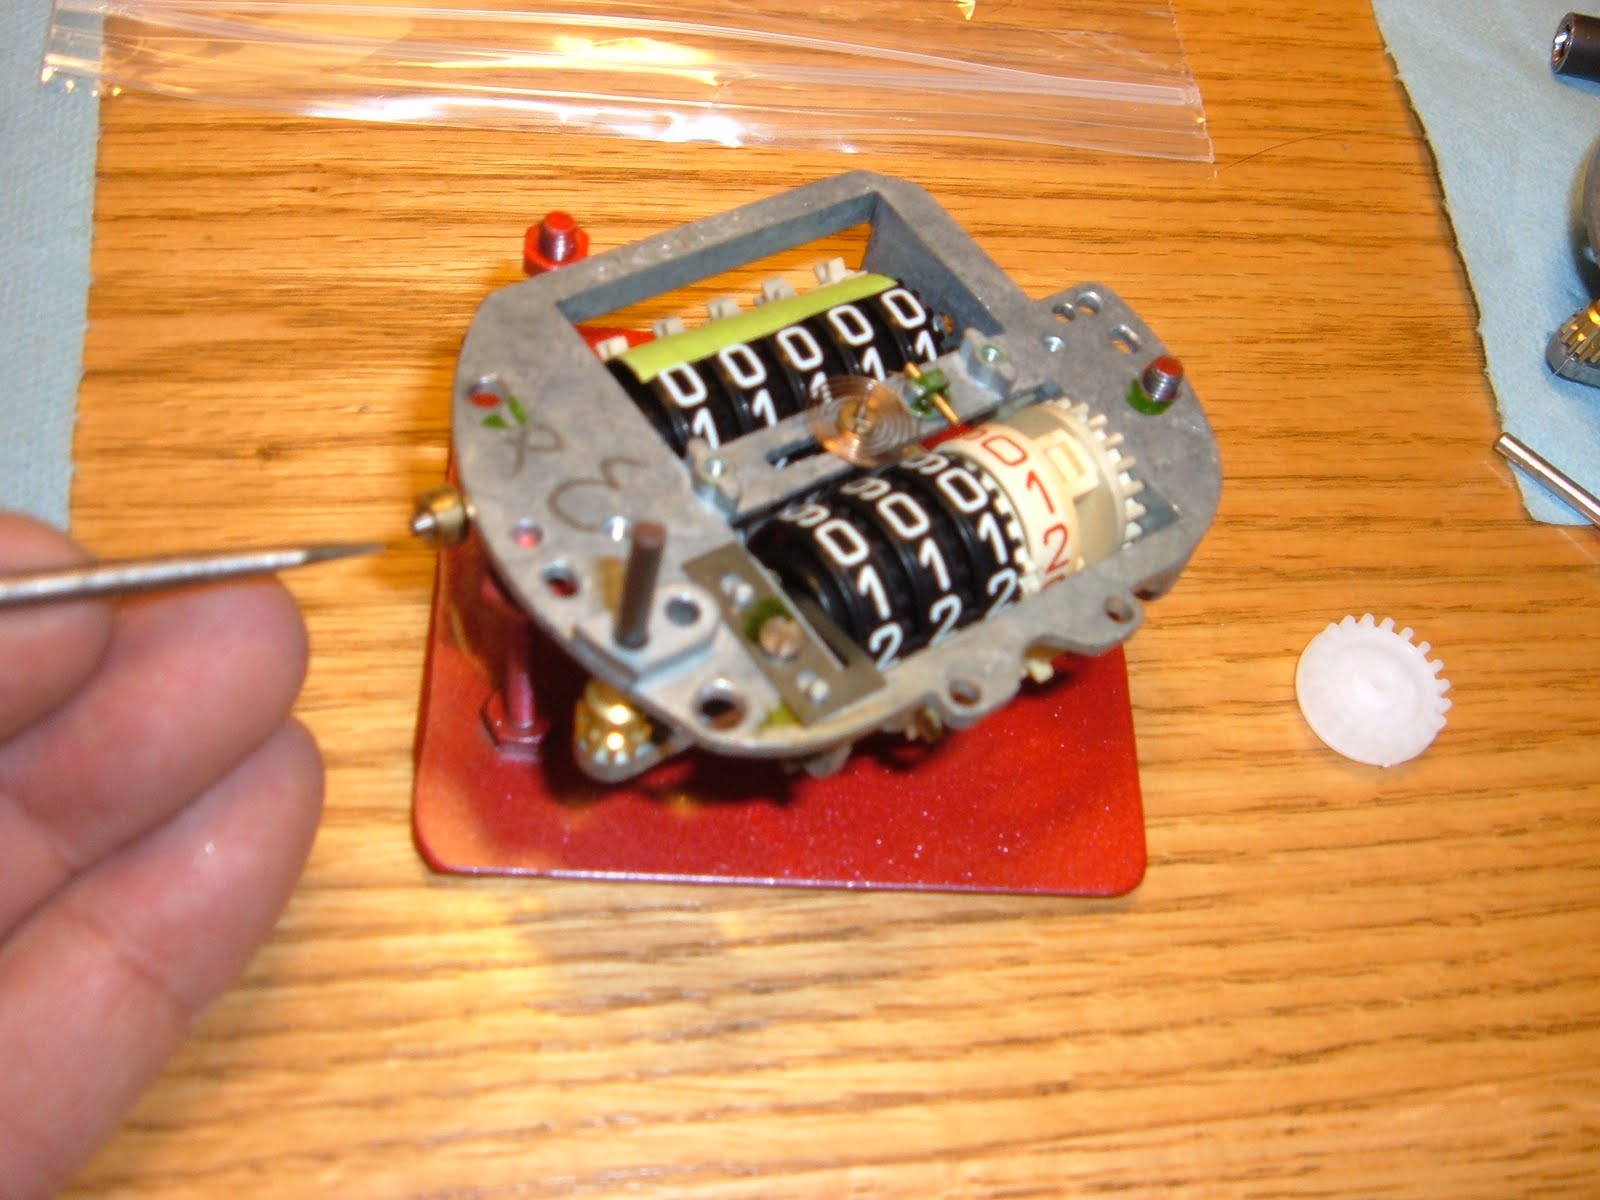
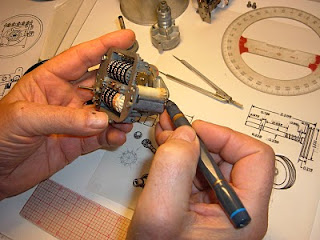 Voila! the face is off and I have the front half of the speedo in my left hand. I've set aside the rear portion of the unit. I'm pointing to a plastic gear that is in the chain of gears that drives the odometer [and the trip meter as well]. Unfortunately, this easy-to-get-to plastic gear is NOT the one that gives up the ship in these speedometers. ARRRGGGHHH!
 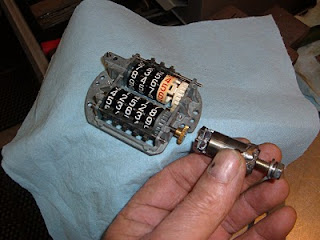 See that little brass gear? That little sucker isn't the one that goes tango uniform, either. But it has to be pulled to get to the bad one. The bad one is the GREY pot metal gear just to the right of the numbers register that is on the bottom in this photo, between the last register and the speedo frame. I built the little puller I'm holding. That little sucker pulls that wee brass gear quite nicely. THEN...I can take the numbers drums out, get the bad Grey gear [called an "advancer"], replace it and chuck it all back together. Fun times!
 I hate to re-create wheels. So I spent time drawing [in rather a lot of detail] exploded views of all the gubbins in these speedometers. Makes the process of disassembly, cleaning, repair, oiling and reassembly a whole lot easier. So if your odometer refuses to odo, I can make it all better once again, because, see...I speak speedometer...HA!
I've been repairing these VDO speedos for some years now. I don't see them as some sort of mysterious device that can only be repaired after a lot of money has changed hands. Give me a shout--let's talk about what it takes to fix the VDO speedo in your wee Saab.
I regularly have a need to bend pieces of sheet steel or aluminum, or strap of either persuasion. A small brake was in order, so....I built one. The component parts are shown here. 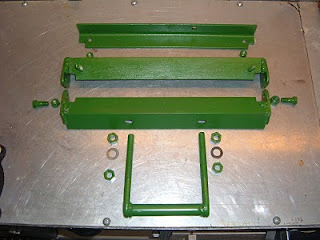 There are three pieces of 1.75" x 1.75" x 0.200" steel angle, some 0.200" thick pieces of plate [at the ends of two of the angles], a couple of 0.50" diameter "J" bolts, a 6.0" piece of 0.75" O.D. pipe, and two 7/16" bolts with nylock nuts.
 Here it is, assembled, with a piece of 18 gauge sheet steel set in place, ready to be bent. [The light colored piece in the middle of the brake is the steel to be bent]. The aft, LOWER angle is mounted in my bench vise. The aft UPPER angle holds the piece to be bent into place by tightening the nuts on the welded-in-place bolts on either end. So now it is just a matter....
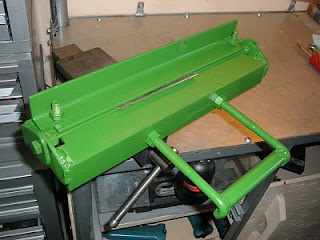
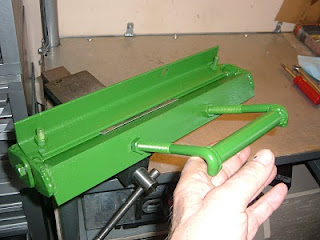 ...of lifting the handle to bend the piece of steel sheet. The brake will accept metal up to 12.5" wide,
and will easily bend aluminum sheet up to 0.125" thick and steel sheet up to 16 gauge. It will also bend steel strap up to 0.125" thick and 2.0" wide.
 The angle of the photo isn't great, but it does show the piece of 18 gauge bent to about 45 degrees. At this point, I simply loosen the two nuts on the aft TOP angle and slide the bent piece forward, out of the brake. As they say in the translated instructions, "Welding, some drilling and cut is to be required." Followed by three equally well translated paragraphs on how not to kill yourself with your welder, your drill press or your hack saw.
At any rate, this is an easy to build, and very useful little tool that takes up very little storage space for the 98% of the time you won't need it. And it works like a champ for that 2% of the time when you DO need it.