These are the [made of unobtainium] back up light switches for Saab 95/96/97 cars that I recondition. The drawing above shows where the switch is located on the Saab transaxle, and the internals of the switch. Nothing much to them...right? Well, yes and no. Because of the nasty environment where they "live", they get really grubby and corroded inside. The trick is to get them apart without destroying them. AH! as the Bard of Avon said, "There's the rub!"
Here are 16 switches. At the bottom, one switch disassembled. Above, are 15 switches that I have reconditioned and tested. As I said, getting them apart without destroying the switch is the trick, and it is a bitch....unless...
...you happen to have my special tools. Top center--the tool that holds the switch so you can use the bottom tool to UN-crimp the steel body of the switch WITHOUT breaking the plastic switch body. The same tool is used to RE-crimp the steel body of the switch. The little red tool is a special holder for trimming tiny brass screws that I sometimes have to use to hold a new connector when one of the electrical connector tabs are broken off.
If you are wondering where to get these tools....they're made of unobtainium, too. Just send me you dead switch and I'll recondition it. When I'm done with it, it will look like one of the 15 switches in the center photo. Good stuff, huh?
Showing posts with label Transmission Rebuild. Show all posts
Wednesday, January 13, 2016
Thursday, February 20, 2014
A REBUILT TWO-STROKE SAAB TRANSMISSION
Here we have an expired four speed transmission from a '66 Saab 96 two-cycle. The half inch accumulation of grease, dirt and general crud has been cleaned off the outside of the box. I put it in this position to remove the retaining bolts from A] the end case cover, and B] the bell housing. You can see that these bolts are missing in the photo above. Now the transmission itself can be lifted off the bell housing and installed in the Saab transmission press.
The bell housing assembly has been partially wiped out inside, but I get them much cleaner before I do any reassembly. The clutch shaft--which you can just see inside the housing--has to come out so the center ball bearing can be replaced.
I clean and paint the axle drivers, as you can see.
Now this is more like it! I changed all the bearings, synchronizer rings and shaft lock plates, plus the main shaft which had rust in the free wheel hub. The correct end plate shims are in and the shift selector forks [gold color in this photo] have been adjusted [fore/aft] correctly. I use anerobic sealer on both sides of the gaskets so synthetic oil can be used with no leakage problems.
VOILA! The little beauty is ready for installation in the little popcorn popper! I do use a gasket at the top shifter cover, again with anerobic sealer on both sides of the gasket.
You can see my rebuilt clutch release arm with a new release bearing in this photo. I also add a petcock so the transaxle oil level can be checked without having to remove the little plug on the side of the box. So let's go ring-a-ding--ya sure!
Friday, September 6, 2013
SONETT TRANSMISSION COFFEE TABLE?
I completely reconditioned this Saab Sonett transmission and kept it as a spare for my last Sonett. Then I got soft in the head and sold the Sonett, and the new owner didn't think he needed a spare transmission. I discussed using it for a coffee table mount with my wife, which turned out to be a short discussion. So it is available for someone who needs it for his/her Sonett.
The trans has new bearings, seals, gaskets and a number of other internal parts. You can see the new clutch release bearing and rebuilt release arm in this photo. I made all the internal adjustments to Saab spec's. The freewheel has been "neutered", using one of my neuter kits. Its READY TO GO! But I still think it would make an interesting coffee table....
If you're interested, give me a growl.
Wednesday, April 3, 2013
SAAB SONETT III SHIFTER REBUILD
The drawing shows the shift linkage for a Sonett III, from the shift tower [on the left] to the transmission [on the right]. Both the shift tower and the linkage support [bolted to the transmission] have two bronze bushings [see arrows]. Saab must have managed a "real deal" on the bushings because they get sloppy after only a few jillion shifts, and that, along with the fact that Saab did not add spring in the linkage to load the shifter to the 3rd-4th gate, can make selecting the correct gear a bit of a crap shoot.
These are the parts for the linkage at the transmission. But first, one other comment: The actual movement--INSIDE THE TRANSMISSION--from neutral to say, 3rd gear, is only about 1/2 inch [13mm] or so. So it doesn't take much slop in the linkage to confuse gear selection. That's why bushing wear can make things sticky-wicket in the shifting department.
Above--the support fixture with all the bolt holes has a bushing in each end. These are the ones that have to be replaced. Problem is, correct SIZE bushings are not available.
I get bushings that are just larger than the originals, chuck 'em in the lathe, and carefully machine them until they are just about 0.002" larger outside diameter than the inside diameter of the support housing. Then I press them into the housing. Above is my lathe setup for machining the new bushings.
Here is a photo of the old bushings and the support housing with the new bushings installed. Note that once I press the new bushings into the housing I still have to ream the INSIDE of each bushing to shaft size plus 0.002". Note that I also drill and tap the housing for a grease zerk so the bushings can actually be lubricated. [THAT is a novel idea the Saab engineers never thought of, apparently....]
This is the finished product, ready to go into the car. Might last a few jillion more shifts, especially if it gets a squirt of grease now and again...
Saturday, March 23, 2013
SAAB V4 TRANSMISSION TROUBLE
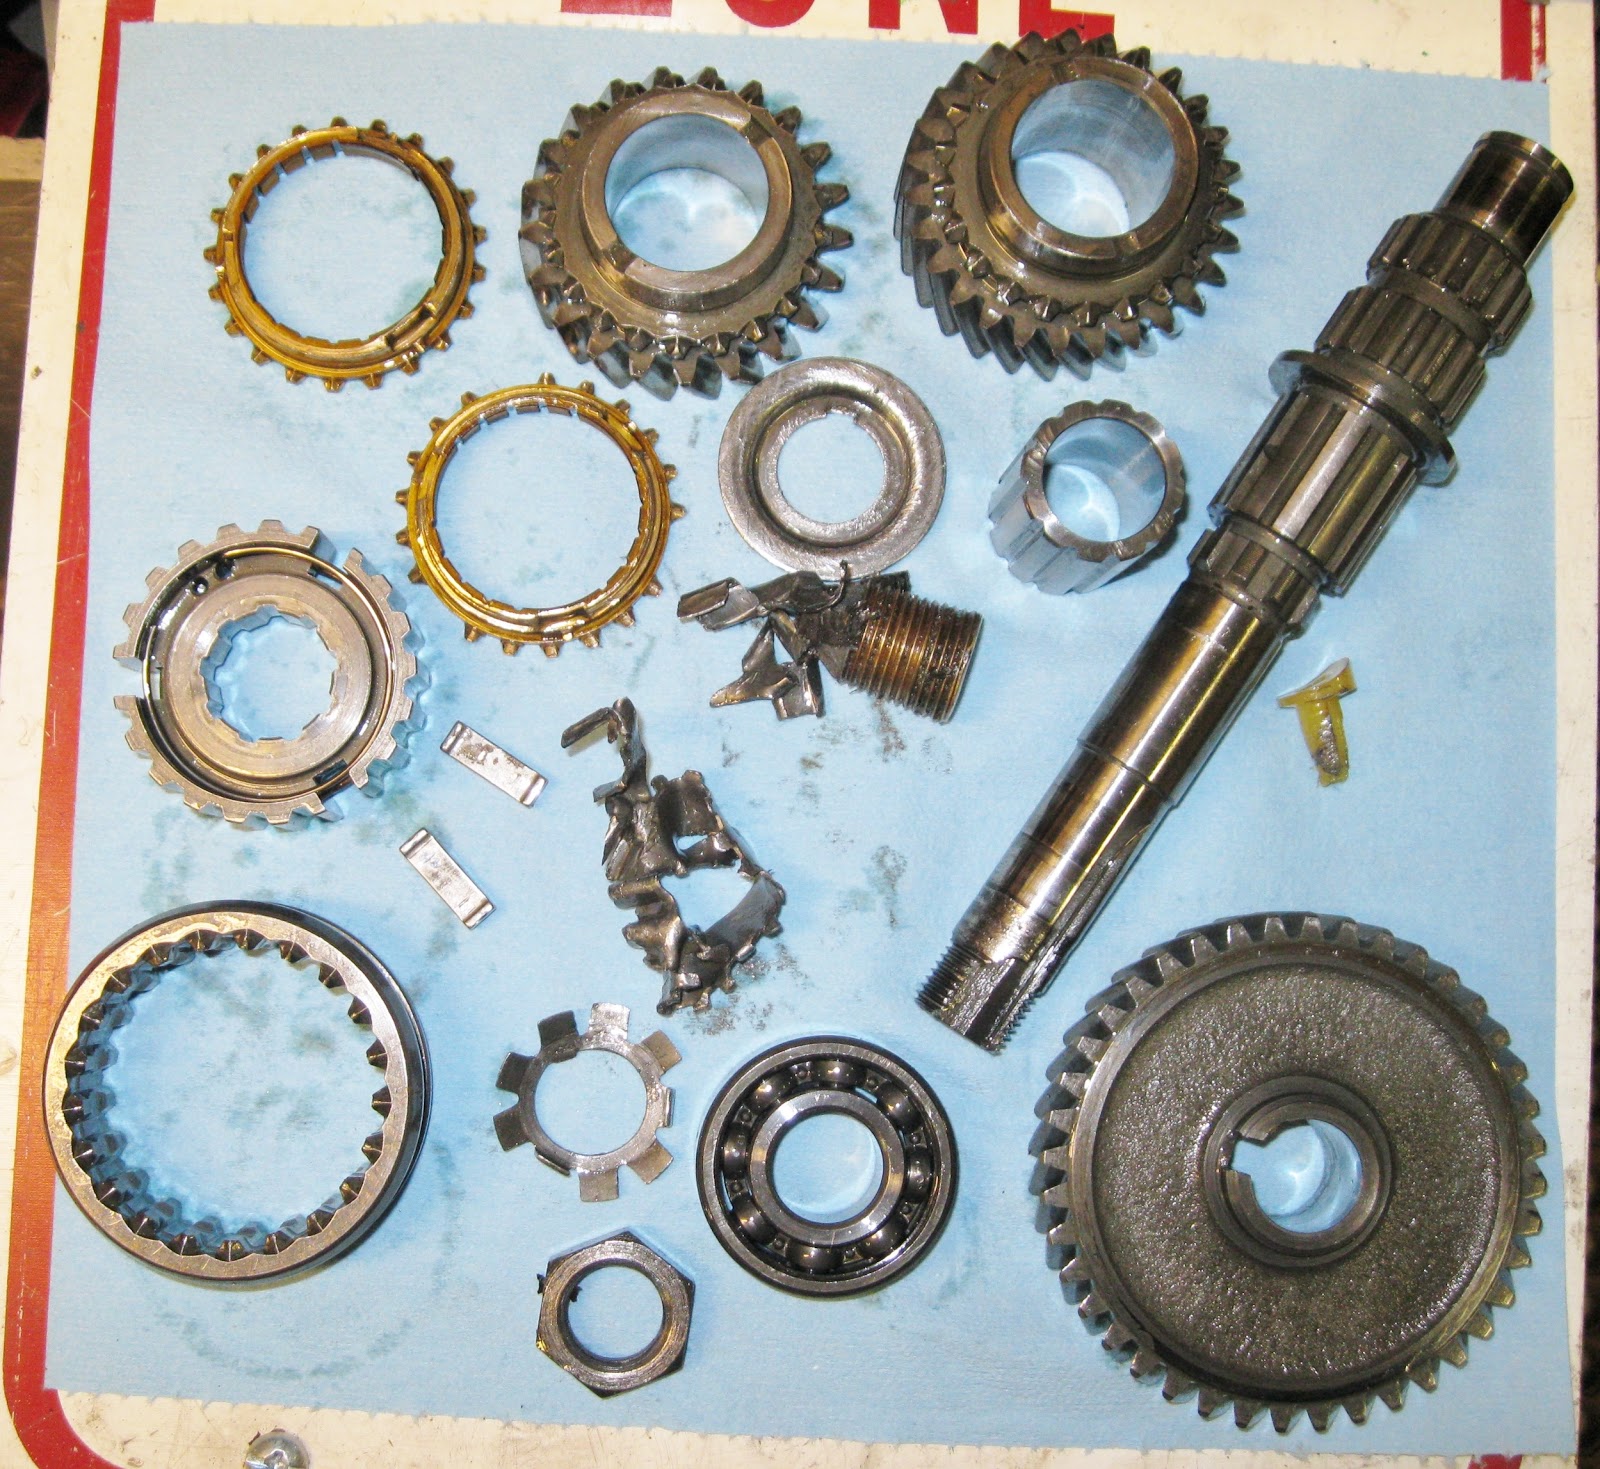
These are a few of the buggered up transmission parts that I found in the bottom of a transmission I just rebuilt for a customer. This was strange because I usually don't find this sort of damage. It was also strange because the transmission was CLEAN inside. Clearly, someone had been into it recently and had screwed up the job. Also--parts were missing and every case bolt was WAY too tight, as if it had been put together using an impact wrench, which is NOT a good idea. ALL the bolts/nuts in these Saab transaxles must be torqued to the specs provided by Saab in their factory service manual.
Once I had the bell housing off, it was clear what had happened. The nut at the end of the countershaft [shown] had come loose. The shaft then "floated" and the result was that every part shown--3 gears, the shaft, low and second synchronizer rings, the synchronizer hub and a bunch of smaller parts--were all busted up and had to be replaced. All because the moron who was into the transmission last did not correctly torque the nut at the end of the countershaft. OY!
Well, here is the reassembled gearbox. All countershaft-related damaged parts--as well as others damaged because of the countershaft problem--have been replaced. Note that the 'box is in my factory transmission jig. Using this jig--and the 20-odd factory tools that go with it--is the ONLY way to be sure that an overhaul of one of these transaxles is done correctly.
There are a number of internal adjustments that MUST be done correctly--some with correct thickness shims, some with feeler gauges, and this one with a dial indicator set up--to insure long life and reliability of the transaxle.
Here is the finished transaxle. I always specify the use of synthetic transmission oil--AMSOIL being the BEST, in my opinion--so I use an anerobic sealer, which is not attacked by synthetic oils--for all case mating surfaces, and on both sides of the rear cover and top cover gaskets.
Another view of the completed transaxle. Note that there is NO freewheel control lever. This unit has been "neutered" so the freewheel--a carry-over from two-stroke engine days--does not function. It is very easy for the V4 engine--which actualy has TORQUE [compared to the two stroke] to damage the freewheel unit. It is worth noting that I DO NOT weld internal parts to neuter the freewheel! At any time in the future, the freewheel system COULD--if the owner got soft in the head--be put back into use.
Subscribe to:
Posts (Atom)