skip to main |
skip to sidebar
Mass production time again! Here are six [of eight] Bosch distributors for Saab V4 cars, completely disassembled, and with a zillion miles worth of grease and crud cleaned off. They are ready to have the bottom of the distributor housing rebushed. The housing "hogs out" at the bottom, with age and a jillion miles of useage. This wear causes the point gap [thus the dwell and the ignition timing] to fluctuate and the engine runs like crap. Note that the second housing from the right already has a steel bushing installed.
I use a bronze bushing...BUT...first the distributor housing must be reamed to a certain diameter. It is essential that the distributor be held perfectly square and the tool that I made [which is in the lathe chuck in this picture] does that job. You can see that several distributors have been drilled, thus the pile of aluminum FUZZ on the lathe bed.
You can see the bronze bushing set in place, just ready to be pressed into the distributor housing.
Once I get the bushing in place, I have to ream it to the shaft size, plus 0.003". This is a tedious process, but doing the job with a hand reamer makes sure I get the correct fit. Every distributor is a LITTLE DIFFERENT and has different amounts of wear--remember--these suckers are about 50 years old!
You can see the five distributor bodies with bronze bushings and the one with the previously installed steel bushing here. All the shafts have been fitted and they are ready to go back together again. Now the REAL work starts, as the points advance plates must be fitted and adjusted, a vacuum control unit fitted, and then the assembled unit has to go onto the SUN distributor test machine to set the advance curves. This usually means I get to take the suckers apart 2 or 3 times to adjust the mechanical advance gubbins to get the correct advance curve. Swearing usually helps. Quite a lot of swearing helps quite a lot more.

All eight completely reconditioned distributors are shown here. These all have points and a condenser installed. If the customer wants a Pertronix unit, I take out the points and condenser and install the P unit. Then I add a rotor, a cap and a new set of spark plug wires, and the bugger is ready to go into the customer's V4 engine, for another 100,000 miles. Good stuff!
I've just reconditioned another Saab V4 engine, this one for a '73 Sonett III. The photo above shows new piston rings about to go onto a cleaned up piston. Note the piston ring expanding tool at the right. The yellow sleeves are to protect the crankshaft when the piston is installed in the engine block. I always have the connecting rod big ends "sized" and always use NEW connecting rod bolts and nuts. These are torqued to a "stretch" or "yield" condition and can NOT be re-used, as they may well break if they are again torqued to yield.

I always take a picture of the installed, new timing gears and tuck the photo into the records for that engine [this one was rebuild number 474...]. Note the new design of the big camshaft gear. Nice quality...BUT...the manufacturer didn't do enough homework. The two standard bolts that retain the intermediate plate [visible at the very bottom of the photo] contacts the outer ring of the aluminum center of the gear. I make special THIN head bolts to retain that plate and use Loctite to keep the bolts in place--no room for lock washers, not even the thin spring plate type. I call that "close, but no banana".

Note the big valves in the right cylinder head. I use these big valves in ALL my reconditioned V4 engines. ALL the valve parts are NEW except the top retaining plates that hold the split keys. The exhaust valves are hardened and I install hardened valve seats for the exhaust valves. This was a warmed up street engine so the owner wished to stay with a single barrel carburetor. I use NEW Weber carburetors on ALL reconditioned V4 engines, this one a 34 ICH.

You can see the Weber carb and special air cleaner assembly, the reconditioned Bosch distributor, the new oil fill cap and the light flywheel and new clutch and pressure plate. What you can't see is the camshaft, reground to Iskenderian F4 specs, and the new tappets [cam followers]. The yellow tabs are shims this clutch set required to get the release bearing plate [the six-sided plate in the center of the pressure plate ass'y] in its correct fore-aft location. The six shims go between the pressure plate and the flywheel. These MUST be offset by installing a slightly thicker shim WASHER under each of the six coil springs inside the pressure plate. About HALF the NEW clutch kits [clutch disc and pressure plate] I get these days require this shimming. I am really picky about the machining of the flywheels to maintain the STOCK depth of the pressure surface to the pressure plate mounting surface, so I know the problem is NOT the flywheels. Necessity, someone said, is the mother of invention......
Every V4 Saab owner's dream: A hot dog V4 engine with the legendary cross-ram intake manifold and a pair of Weber DCOE carburetors---WOW! This is one of two such engines that I built for a pair of Peking to Paris Saab 96 rally cars some years back. Note the special distributor, necessary to clear the intake runner for the right carburetor. Most, if not all, of these special intake manifolds were made up in England for Saab in enough quantity for Saab to qualify for homologation according to international rally competition rules. The manifold set you see here is the "factory" set-up.

There were several "wannabe" intake manifold builders so if you run into a cross-ram set-up it may or may not be what you see in the top photo. Each wannabe also made up some sort of distributor extension. In this photo, the distributor on the left is the Bosch unit made specifically for Saab for the rally cars. The distributor in the middle has an extension that uses a standard distributor. The distributor on the right is a stock unit, though the drive gear at the bottom has not been installed.
Here is a good look at the Bosch distributor made up for Saab. You can see that the distributor body and the extended shaft housing are all cast in one unit.
This is a third distributor for a cross-ram manifold set. The housing extension is different [shorter] than the one shown above. I just rebuilt this distributor for a customer. The add-on housing looks OK in the photo but is actually really crude and looks like it was done by two guys under a pepper tree with a hammer, hack saw and bastard file after the second six-pack of Bud....
The reconditioning of the distributor was straightforward, and I made the extension work, but a much better extension should be machined from a bar of good quality aluminum. I have made up machine drawings for just such an extension.
Does the vacuum advance unit look different? It's a much modified Hitachi with a special adaptor mount. I get the exact advance curve I want with this unit, but it is NOT "Plug & Play", with MUCH testing on the SUN distributor machine to be sure I have the correct modifications to get the right advance curve.
It is important to understand that advance curves--both mechanical and vacuum--must be tailored to the way a given engine will be USED; the goal being to promote performance while preventing pre-ignition [detonation] that can destroy an engine. Fun stuff, but as they say in the ads, "Don't try this at home..."
First--my apologies for less than wonderful photos. A BLACK engine is not the greatest for award-winning photography...This is the completed Ford/Saab V4 high performance engine, ready to go to the owner, to "wake up" a Saab 96. It will produce 110-115 horsepower--quite a step up from the original 73...
The car in the background is my '37 FIAT Topolino, "MR T".
Front view. Note the timing cover--modified to give room for a radiator with electric fans. Behind the cover are special timing gears--steel gears for crankshaft and balance shaft, aluminum gear for the camshaft. The cam itself is a regrind to Iskenderian F4 specs. Atop the engine is a Weber 32/36 DGV-5A carburetor and air cleaner.
Right front corner. The new oil filter and water pump are visible. Not visible--big valve cylinder heads and fully balanced crankshaft and associated parts. I reconditioned and lightened the rocker arms as well. Note the engine lift [in red], an item I built 40+ years ago. Good tools last a very long time...
Arse end. Note the reconditioned distributor and high performance Magnecore plug wires. Note also the light flywheel and matched pressure plate. The blue paint indicates the balance-match [pressure plate to flywheel] point. The bits of green tape seen here and there are to cover coolant pipes, etc, as the engine is to be shipped to it's owner in another state. I send along a compete listing of all the parts and all the work done on these engines [9 pages long on this one...] plus a short "manual" on doing the necessary re-torques and adjustments as the engine is driven in the owner's car.
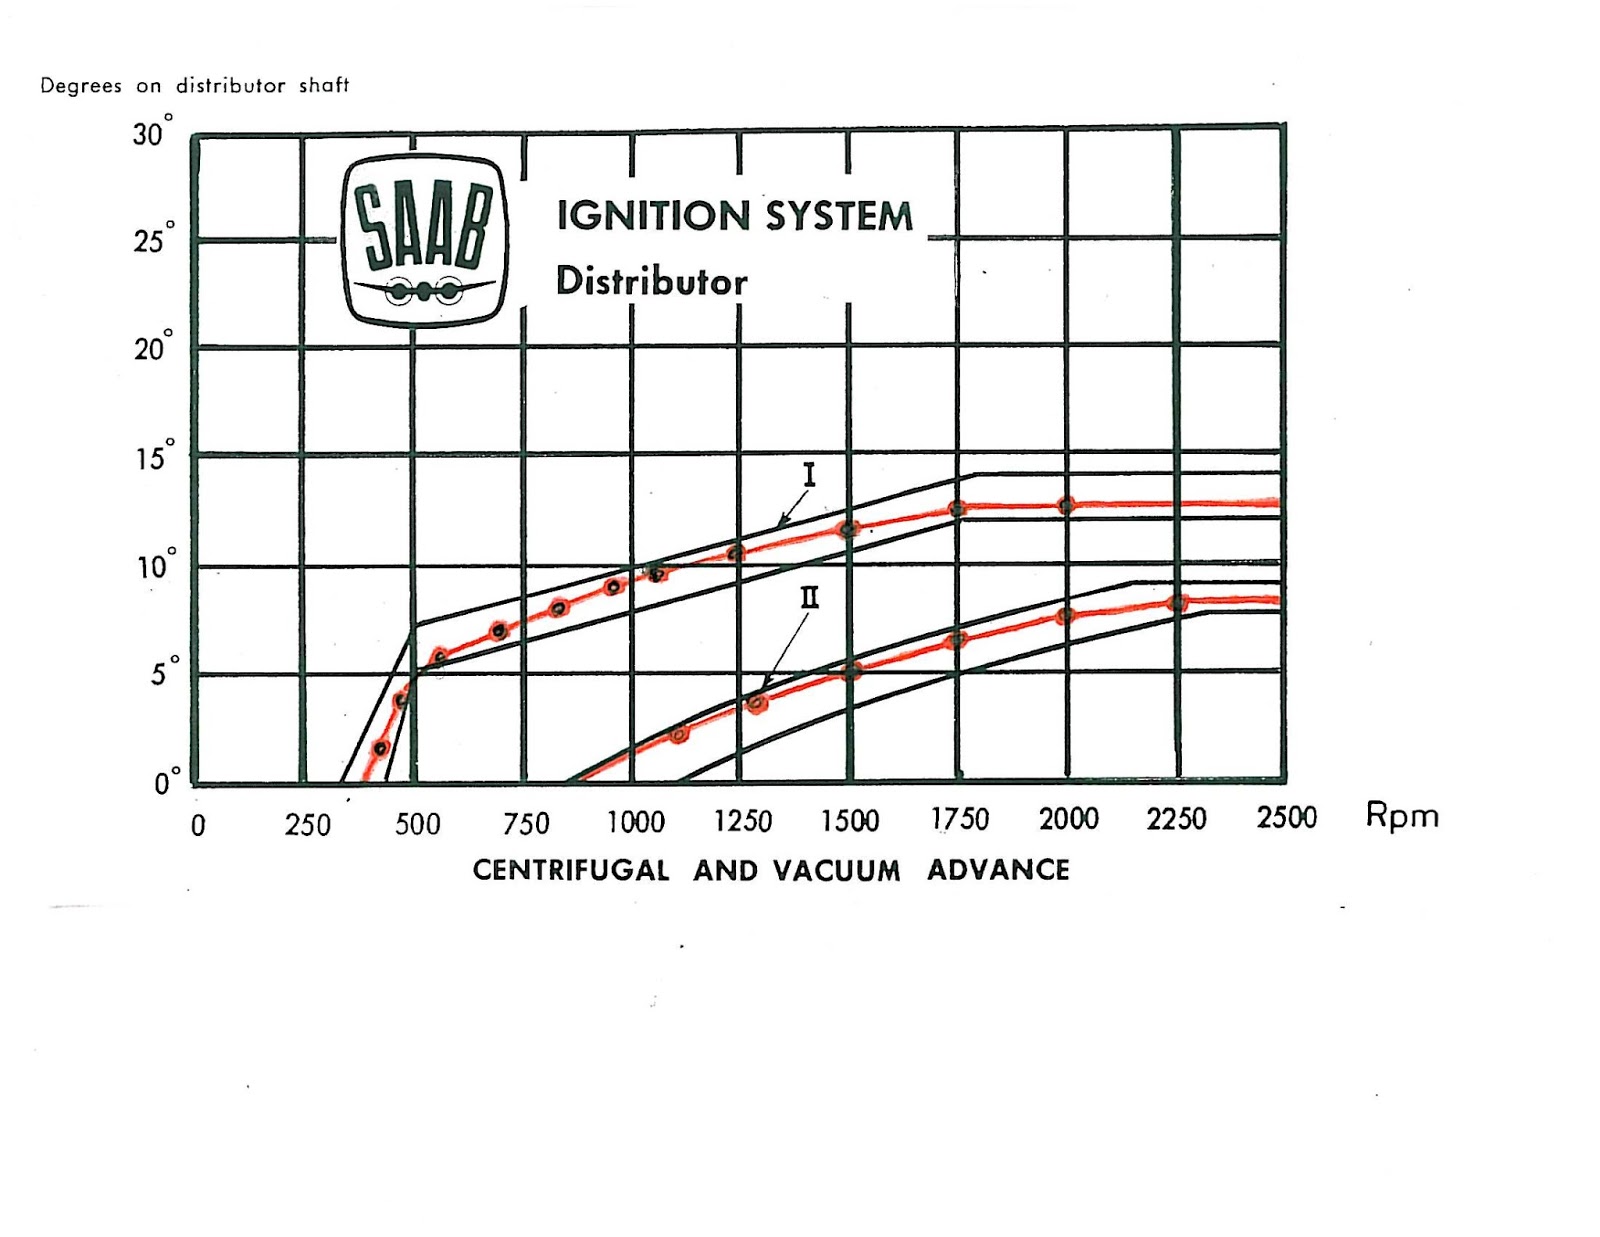
As promised, here is the SUN distributor test machine, with a Bosch/Saab V4 distributor installed for testing. When the machine is running, an arrow appears on the large black INNER ring below the distributor. Just outboard of that is another black ring with degrees etched into its surface. As distributor RPM increases [by turning the knob at the bottom, below the black rings] the arrow moves anti-clockwise, indicating degrees of advance for that RPM. The top meter on the right measures the RPM. I plot the RPM for each degree of advance, in order to see the mechanical advance curve.
A typical advance curve--taken right from my distributor reconditioning records book--is shown in RED above, plotted over a set of minimum/maximum curves, as shown for that particular distributor, in the Saab V4 Service Manual.
When the actual plotted curve [RED] is NOT within the factory spec's, I have to disassemble the distributor and change one [or both] of the wee springs in the advance mechanism. Depending upon the distributor type, there may or may not be an additional mechanical adjustment that I can make. Remember---there are at least a dozen different Bosch distributors used by Saab in their V4 model run from 1967 to 1980.
Without plotting the mechanical advance curve, using the SUN machine, you have no idea what the distributor is doing and I guarantee you--if the curve is significantly outside the minimum/maximums, the engine will run poorly, no matter what tune-up and/or repair you have done to it.
The bottom curve is a plot of the vacuum advance, also done on the SUN machine, or with a special machine I built for the purpose. Again, Saab shows the ideal minimum/maximums for that curve. The RED plot shows the curve of the vacuum advance unit I used for this particular recondition job. One thing to note: if the vacuum advance does not work, the engine will run like crap even if you have the timing and carburetion set perfectly. How is YOUR V4 engine running?
One thing I have found out over the years of reconditioning distributors---the SUN machine never lies.
It all comes together! Above--seven reconditioned Saab V4 Bosch distributors. In the center, the last one, still in one of my holding fixtures. Each distributor has been re-bushed, and all new parts installed, including the vacuum control units.
Here are the seven reconditioned distributors. Depending upon the customer's needs, they may be delivered with points and condenser installed, or a solid state Pertronix unit, if that's what the customer wants. All will have a new rotor and new distributor cap. If the customer wants a new spark plug wire set, he/she can get that too.
Next step--I'll put each one on the SUN distributor machine and set the mechanical advance curve. The vacuum advance curves have already been plotted on the tech sheet for that distributor. I give the customer a copy of the tech sheet, which shows the advance curves and all the parts that were used for the rebuild.
The next blog--the mysteries of the SUN machine...heh heh heh.....

This photo shows a wide variety of Bosch distributors and distributor parts--ALL of which were supplied to Saab for their V4 engines. There were at least a dozen DIFFERENT Bosch distributors used on the Saab V4 engine, and while some parts are interchangeable, many are NOT. On the left is a really nasty Bosch/V4 distributor--typical of the way they look when I receive them. Moving to the right, there are 7 different drive gears. To the right of that the MAIN distributor parts---body, main shaft, top shaft. Then, a vacuum control unit [one of a dozen different ones used], a points plate [one of four used], a condensor [one of 10 different ones used], a set of points [one of two used], and a rotor [one of 6 used].The box holds half a dozen different top shafts, then several different movable points plates, and one of two different distributor caps. Finally, there are three different distributor assemblies and two different vacuum control units. I've reconditioned close to 500 Bosch distributors, and I still--occasionally--run onto something I have not seen before!

Here are two Bosch V4 distributors with MAJOR differences. The top unit is what I call a "notch body" distributor. Note the extended casting on the side, near the top of the distributor body. This requires a vacuum control unit with its mount configured for that notch body. The distributor body below it is a "round body" type. Note that the vacuum control unit is assembled with a round mount.

Inside, the fun is just beginning. On the left is a very early internal shaft assembly, on the right one of the later shaft assemblies. Because of the orientation of the rotor notch in the top part relative to the 4 lobes that open the points, these will NOT interchange. To further the fun, the later assembly [on the right] has four different lobe-to-notch arrangements and they will NOT interchange, either. In reconditioning these distributors, it is essential to know what parts are compatible. If you don't, you will probably get the thing all back together again and it simply will not work. Fun stuff, eh?

This shows the parts of the internal shafts. On the left, starting at the top, the lower shaft. On either side are the two mechanical advance weights, with their control springs just below them. At the bottom, the top shaft, with the four lobes that open the points, and the notch for the rotor. On the right, the assembled shaft. I control--and can tailor--the mechanical advance curve of the distributor, by changing the advance SPRINGS. I plot the actual curve by running the distributor on the SUN distributor machine, noting the degrees of advance at various readings through the useable RPM range. Sometimes a lot of springs get changed before I'm satisfied with the curve.

Virtually ALL the distributors I receive must have a bushing installed at the bottom of the distributor body. I use a special tool to hold the distributor body so I can drill it in the lathe for the brass bushing. In this picture the bushing has been installed and this setup is for reaming the bushing to the correct inside diameter. This is a fairly delicate process, to get JUST the right I.D. for the shaft, plus just the right clearance. Well....after bushing close to 500 distributors, I DO have that process figured out.
What makes YOUR V4 distributor a candidate for reconditioning? Uneven idle, poor performance, excess fuel consumption, hard starting are a few symptoms. Remember---these gesparkers are 40+ years old! Many Saab V4 owners are amazed at how much better their 40+ year old Saab runs with just a properly reconditioned distributor installed. How's yours running?