Monday, November 28, 2011

VINTAGE SAAB V4 FUEL PUMPS

The passage of time produces interesting contrasts. One of the most notable is how we use our cars. When I owned a Saab dealership (1967-1974), V4 Saabs were used as daily drivers. Twenty years later, only a few were in daily use, and the emphasis was on keeping them running.
Fast forward another 20 plus years...today most of the V4 powered Saabs are driven on weekends or occasionally and almost never in any inclement weather.
Restoration continues on some of the "lucky" V4 cars still intact and with that there is an almost anal emphasis on "originality."

A number of owner/restorers "beat their chests and rend their shop coats" over fuel pumps. We're talking about an item that is mounted low and almost out of sight in the engine bay.
"That's not original! It's not like the one I took off my engine!" claimed an owner. The logical response was "Is the pump you took off original? Do you even know what was original?"

I'll confuse you with some facts: Ford used at least THREE different series of Pierburg fuel pumps on the V4 engines sold to Saab on contract.


As the years went by and the supply of "original" pumps dried up, Saab contracted with various manufacturers for replacement fuel pumps and sold them to dealers and customers.
So, does this make them "not original"? They DID have Saab part numbers and were sold by Saab dealers...

HELLO? We're not talking vintage Packards or Duesenbergs here...But if having a hissy-fit over a part that you can barely see when you look in the engine bay makes your day, then go for it. But do compare that greasy, drippy lump of a pump with the pumps shown here...just to make sure that the bucks you spend on rebuilding it are for an "original."

Sunday, November 27, 2011

VINTAGE SAAB SPEEDOMETER 1.2

The VDO folks tried to make one basic speedometer fit a whole batch of applications. For Saab alone, this basic speedo worked for 10 or so different cars!
Different transaxle final drive ratios meant that they had to have different ratios INSIDE the speedometer so any one car had the correct speed and miles recorded. This photo shows the left side of a Saab VDO speedo with the little side transfer gear set removed.


At the bottom of the photo you can see the transfer gear set.
I did the exploded view drawing below to show the side transfer gear set at the extreme right. The lateral transfer gear set is just to the right of the main speedometer body. The ball is used to retain the lateral gear set. You need a special, very small, puller and press to push out the ball so the lateral shaft can be removed without damaging it.


The exploded view also shows the trip register reset mechanism [extreme left in the drawing]. The tiny cog wheels at the top and bottom advance the number wheels at the appropriate time.

This is a close-up drawing I did of the main speedo body, with the side transfer gear set still in place. This gear set must be adjusted for the correct mesh with the gear on the end of the top [primary] mileage register.

The four arrows show the worm drive gears on the two shafts and the two gears--that are selected for a given transaxle ratio. The gears are different diameter and have a different number of teeth. So a single speedometer "main frame" can work for a 2-stroke with 5.23:1 final drive as well as Sonett V4 with a 4.67: final drive, by changing the gear sets. Clever, eh?
My next blog will be about some special tools and why I needed them.

Saturday, November 26, 2011

VINTAGE SAAB SPEEDOMETER 1.1

Now the fun begins. The knurled, round knob secures the big "U" bracket that holds the speedo into the instrument panel. The thin hex nut holds the speedo "innards" to the outside case. I have to be careful with the relatively delicate gubbins from here on.

I built a holding fixture [in red, below] to hold the speedo securely in my vise so I don't slip and bust some tiny part while I'm trying to replace damaged bits.Then I clean and re-lube the working gizzmos. The 40 year-old grease in these babies gets real stiff. I use a dentist's pick [AKA "torture tool"] to clean the old grease off the gears!

The gear train for resetting the odometer trip meter register is on the lower left on the speedo inner frame. The round drum is where the magnet and speed needle cup are located. At the top is the main odo register [with numbers] and above that the advancer sprockets that allow only the correct number wheel to rotate.

I reversed the mount fixture [red] so I can get to the "innards" easier. See the wee gear train on the side.... these gears are changed to make the speed and miles read correctly for the different transaxle final drive ratios that Saab used over the years.The rest of the "innards" are the same.
My next blog will be more about taking it all apart, with more special tools, steady hands and a lot of TLC.

Friday, November 25, 2011

VINTAGE SAAB SPEEDOMETER 1.0

The Saab VDO speedometer is a good quality instrument. But like all of us, some parts get tired and gummed up after many years, and...uhh...some parts quit working. My drawing shows a dual register VDO speedo with the internal gubbins phantomed in.

MILEAGE recording--on the odometer registers--is accomplished through a double set of transfer gears. My phantom drawing shows the SIDE set of transfer gears. Interestingly, SPEED indication is done magnetically--there is no physical connection from the speedometer cable input to the speed indicating needle. The input shaft is connected to a small magnetic drum that rotates inside a sort of cup that is connected to the needle. The faster the speedometer cable turns, the faster the magnetic drum, and the farther around the speed dial the needle moves. A tiny hairspring insures that the needle always returns to rest at the "0" peg. So now you know, generally, how the thing works.

Next is how to get it apart so what DOESN'T WORK can be fixed/replaced.
I designed and built a fixture [clamped in my vise] that holds the speedometer firmly in place. The ring removal tool [with the green handle] has a specially ground tooling tip that just fits under the stainless ring, that, as I move the tool around the speedo, gently stretches the stainless ring until it pops off the speedometer. CARE and PATIENCE are vital here, but the ring does come off with NO DAMAGE!


I've got the ring off--NO DAMAGE! Below it is the glass, and below the glass a painted trim ring. Now I can get on with the work on the speedo's "innards".

A look at the special fixture that secures the speedometer. Without this fixture it is REALLY EASY to booger up the very soft stainless steel outer retaining ring. I've completely rebuilt a number of these VDO speedo's now--for Saab, VW and Porsche--so if yours is AWOL in the function department, I can rebuild yours, too. Give me a shout---541-499-0246 or email me at jacksonashcraft@gmail.com.
Next---I take you into the VDO "innards". I know---you can hardly wait....

Sunday, April 3, 2011

GOT HOT DOG VINTAGE RALLYE STUFF?


Back when dinosaurs roamed the earth, I did a lot of serious, Monte Carlo style rallies. To be competitive I bought a lot of serious rally equipment. Some of this included a Halda Speedpilot [shown mounted in my '69 Saab Sonett], a back-lit instruction reader [also shown], a Halda Twinmaster [not shown], Heuer rally clocks, and a ton of other goodies including go-fast stuff for the Sonett and driving lights with about a jillion candlepower.


This is the first style of Speedpilot [mine is Serial No. 15363]. I have the original "quick-look' booklet and the factory mount for it. It needs the knobs and professional cleaning and it should be ready to rally! Overall condition is a 7 [of 10], with the exceptions noted. I also have a ton of connecting drive cables and "T" gearboxes, as these units were speedometer cable driven.


This my MK V Speedpilot [Ser. No49691] that I used in various Saabs, Fiats and Honda Civics in SCCA Pro Series and 4-Cylinder Club of America rallies [ca. 1969-80]. I "mothballed" the rally stuff after that time and it has been carefully stored in my heated shop since then. Condition of this little gem is an easy 9 [of 10].


This is my Halda Twinmaster [Ser. No. 30277] and the THIRTY large drive gears--each a different ratio]--that come with it. There are also four small drive gears. The three clips are for drive cable attachment. Condition: an easy 9.


The photo shows my Butler light [for over the navigator's shoulder], a "Tunaverter' unit that allowed tuning a car radio to WWV Universal Coordinated Time, a Saab panic handle, and the rally instruction back-lit reader unit [see the drawing at the beginning of this blog].

I also have seven drive cables, 5 different T-drive gearboxes, and various other bits, Everything is in quite good condition. I'm working on prices for everything. If you have an interest in any of it, e-mail me at jacksonashcraft@gmail.com or call me at 541-499-0246. If you are serious about doing Vintage rallies, this equipment is what you need!

Friday, February 25, 2011

Saab 95 Wagon Progress

Mark sent over some photos of the progress he's making on the 95 Wagon restoration. Looks like has the trans in, and all four corners back int he car.

Transmission installed, together with rebuilt steering rack, axles, brake master cylinder, shift linkage, and new motor mounts:


Rear suspension installed with updated tube shocks:


Rear shock mounts allow the use of tube shocks:


Front suspension installed:


New complete electric fuel pump package installed. Includes easy-to-replace filter, pump and fuel pressure regulator:

Wednesday, December 1, 2010

NEW BOOK ON SAAB V4

I haven't been spending so much time dancing [Kathy and I are ballroom dancers] that I couldn't write a new book. Over the years a TON of Saab owners have told me they want to "restore my old Saab". I know the pause that comes after that will be ended with the owner admitting that he/she have no idea where to start or what all is involved. This 60 page book--based on at least 40 years of repair and restoration experience--is meant to answer their questions.

Starting at the grille and ending at the tail lamps, the book shows--in a logical sequence--system by system and part by part, how to proceed through this extensive project.

The book is NOT A SERVICE MANUAL, though there are some HOW-TO chapters that I haven't covered in the other 16 Saab repair and maintenance books that I have written. And as always, there are a lot of my cartoons and illustrations and diagrams included.

The book covers restoration of the Sonett II and V4 and Sonett III, as well as the Saab 95 and 96 cars. There is a chapter about how to get that pesky hood/fenders assembly on and off the Sonett III, and another on how to rebuild that floppy emergency brake handle. There is a lot of data you won't find in any Saab repair manual--except one of mine--and a chapter on special tools you can build, that you will need for this project.

I ask the owner of this to-be-restored car to be realistic about what parts of the restoration he/she can complete themselves, and what parts should be assigned to a professional. And why. I also offer a bit of advice on how to select the pro to do the work.


By the time the odometer reads something like this one, the mechanical restoration is probably on your mind. This is an entertaining, very informative guide for you that will help you decide if you want to get the restoration under way, and when you do, how to go about it. It is also cheap at twenty five bucks plus S&H. I wish I'd had this book when I did my first full restoration!

Sunday, October 17, 2010

Saab 95 Restoration Progress: Trunk and Fuel Tank Floors

Trunk floors tend to suffer from demon rust on most Sonetts, 96s, and 95s, and this restoration project is no exception.

Fresh sheet metal in the fuel tank opening:


New trunk floor sheet metal:


Fuel tank floor in primer:


Trunk floor and surrounding area in primer:


Bottom of fuel tank floor in primer:


Trunk floor painted:

Saturday, October 16, 2010

Saab 95 Restoration Progress: Floors and Footwell

Much of the front floor and footwell area needed new sheetmetal in the Saab 95 Mark is working on. Here are some quick shots during the process.

Fresh sheet metal welded in place:


Sheet metal is fabbed up with integral bends to match up with stock pieces:


New front toeboards, featuring an access opening for the rear transmission mount. Mark and Jack have created a new rear trans mount that can be removed from inside the vehicle, instead of having to pull the engine/trans to remove it from inside the engine bay:


Entire area in primer:


Freshly painted:


Another view of freshly painted front floor sheet metal:

Saab 95 Restoration Progress: Engine Bay

During my last trip up to Oregon a couple weeks ago, I stopped by the shop and visited with Mark. He;s thick in the middle of two restorations, one for this Saab 95 Wagon, and one for a Sonett III. The Wagon has proven particularly "fun" as there was extensive body rot throughout, as documented here.

Mark has made great progress on this car, so I wanted to do a quick scrapbook of some of his work, starting in the engine bay.

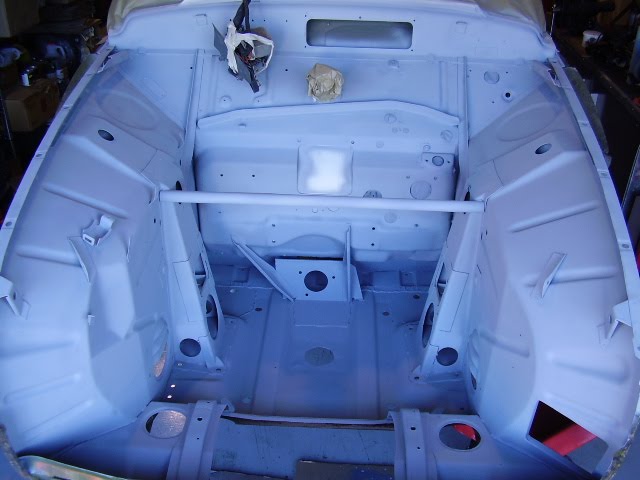
Main engine bay cleaned up and primered:


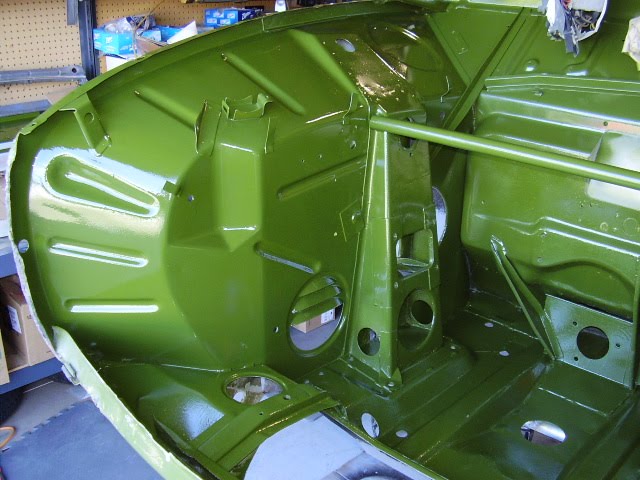
And in paint, using the original paint code for this year:


Passenger side inner fender in primer:


And in body color:


Driver side in primer:


Driver side in paint:


One thing to notice in the above tow pictures is the rectangular access opening at the front of the inner fender. This wasn't stock. the owner of this particular car has thoughts of installing air conditioning, and this opening makes it possible to actually reach the AC belt tensioning device. Here are some pics of they created the opening.

The opening from inside the engine bay:


From inside the wheel well. An access panel was also built that will be easily removed with a few small bolts:

Thursday, September 16, 2010

HOT OFF THE PRESS!

Now you really can "wrap your ass in fiberglass" though my wife says Spandex works better!This is me and my latest HOW-TO book--one of 15 on Saab mechanicals--that just came from the printers.

This tome runs to 112 pages and has 286 illustrations, telling YOU--step-by-step--how to work with fiberglass composites. I show you how to repair virtually everything on Sonetts, how to build air dams, wings, NACA ducts, air scoops, and a TON more!


Here are a couple of pages out of the book to give you an idea about how it is laid out. Illustrations go next to the instructions, which are put in a logical sequence. I tell you how to use polyester, vinyl ester, and epoxy resins, along with a variety of fiberglass cloth materials, including graphite [also called carbon fiber] and Kevlar, along with normal "E" cloth, the cloth used in Sonett bodies. The best part is this: I show you how to do it--safely and easily--right in your own work shop!

I show you a very wide range of repair and construction projects. One of the more ambitious is how to convert the busted back window of a Sonett II or V4 to a three window hatch, as shown here. "It is not original!" Yup, you're right. But those deep draw rear windows are now made of a product called unobtanium, so no matter what you do, the result ain't gonna be "original". This is a pretty good solution, it looks pretty good, and I show you how to do it step-by-step.
The new FIBERGLASS GUIDE books are sitting here, ready to ship. Call me at 541-499-0246 or email me at jacksonashcraft@gmail.com and I can tell you more about 'em. You'll get more than your money's worth at $69.00 plus postage. Get ready...to WRAP YER ASS IN FIBERGLASS!