Tuesday, November 26, 2013

SPEEDOMETER RECONDITIONING--MERCEDES-BENZ


 This is the instrument module from a '78 Mercedes Benz 450SL. It speedo's but it's speedo don't odo.  Drat! So 'twas time to get inside the bugger and work my magic on it. Out with the demon tweak tools!
 This is the flip side of the instrument module. Clearly, a whole lotta screws have to come out to get to just the speedometer.
 Here the speedometer is out of the module. If the speedometer was all that needed attention, that's as far as I'd have to go. But life ain't that simple. This critter was dirty and dusty INSIDE the plastic face plate, so it all had to come apart. In addition to the photos, I made a couple of pages of illustrated notes so I had some chance of getting it all back together on the first pass.....
Here is the bugger all apart. A lot of cleaning was necessary on ALL the internal parts of the module, and then I reconditioned the speedometer itself [lower left in the photo above].

 So, after a lot of cleaning, wiping, dusting and polishing--along with liberal amounts of questioning the ancestry of the designer of this conglomeration of parts--it's done, pretty and ready to go get dusty and grimy once again in a drop top Merc.    And...the odo now odo's---HA!

WINDSHIELD WIPER MOTOR RECONDITIONING--SAAB/BOSCH

 This photo shows all the internal gubbins of an ANCIENT Bosch windshield wiper motor, as used in Saab 93/95/96 two-stroke models of the late 1950's and very early 1960's. It turns out that these early motors were quite high quality, with a lot of brass and evidence of a well thought out design. This motor, which is over 50 years old, showed little wear and tear, and required nothing more than a thorough cleaning, fresh lubrication with modern lubricants, and careful re-assembly.

These early motors did require a careful alignment of the brush holding "saddle" [bottom right in the photo] and even more careful alignment of the permanent magnet assembly [bottom left, in the photo], the latter to assure even clearance of the armature from the permanent magnet. 

The bean counters at Saab got busy after the first 20,000 cars  or so were built, and changed wiper motor suppliers to the German SWF company. Saved a few pennies, but the quality of the SWF motors was crap compared to those early Bosch motors.
I always bench test ANY wiper motor I recondition and this is the setup for this little Bosch motor. The interesting switch on the right is a Saab wiper motor switch, which incorporated the windshield WASHER.  You pulled the switch OUT about three inches and let go, and as the washer fluid began to spray on the windscreen, you turned the switch clockwise to start the wipers.

There were TWO different switches used by Saab, and they looked pretty much alike, but the second series switch had TWO "ON" positions, for the TWO speed motors that were used in the GT 750 and GT-850 Saab 96 cars.  The second series switch still used the same windshield washer setup.

This all worked pretty well unless the washer fluid froze and cracked the plastic pump portion.  Then washer fluid--when it thawed--pee'd on you leg.  Hmmmm....not cool.  So in 1967, Saab switched over to Lucas wiper motors, with an electric motor attached to the washer reservoir, which was now located in the engine bay. No more pee-ing on your leg.  What fun was THAT?

Sunday, November 17, 2013

STEWART-WARNER SPEEDOMETER RECONDITIONING--PETERBUILT

 BIG RIGS have speedometers, too! This one is out of an 18-wheel Peterbuilt logging truck. It came to me dead as a hammer, with over 500,000 miles on the odometer. 500,000---that's not a misprint. Even Stewart-Warner speedos get tired, and it took parts from two old, dead ones to nurse this one back to health. The outer rings and the glass are on the left, the outer housing at the top, and the speedo internals plus the face and speed needle on the right.  I built the holding fixture [in red], a necessary thing when I'm working on the delicate "innards" of a speedometer. Even one from a Peterbuilt.... 
 A different view. The lower inner ring still needs to be painted in this picture, but everything else has been thoroughly cleaned---some parts in the ultrasonic cleaner---and are ready for reassembly.  The special Phillips screwdriver at the bottom is yet another special tool I built. Handy little bugger.
One down, one to go... On the left, the reconditioned and calibrated speedo, ready to get back to work in a big ass logging truck. On the right, all the parts of another Stewart-Warner speedo for a Peterbuilt. Note that the speed faces are different. I ASSUME that the face on the right indicates a later version, as it has speed ranges in both MPH and Km/h.  Except for the case, the parts on the right are ready for assembly and calibration.   See, I can have fun with TRUK parts, too---HA!

VOLKSWAGEN WINDSHIELD WIPER MOTOR RECONDITONING--SWF

 BAD? Dead, too. This is typical of SWF wiper motors I receive for reconditioning. These were used in a TON of V W's, some Saabs and who knows how many other Euro cars--Borgwards, NSU's, DAF's, early Porsches, etc. They came in one and two speed varieties, though the only external difference was the contact panel [bottom left, on the unit].   This one is definitely dead. 
 Here are the [cleaned up] internal parts. From the horseshoe shaped permanent magnet [bottom left], clockwise: the armature, the aluminum base assembly, the brush assembly with wires to the contact plate assembly, the main drum gear and bottom plate assembly, the smaller intermediate gear, and  the cover bail + four bolts.  It is worth noting that these parts usually look like they've spent time at the bottom of a swamp when I take the motor apart. Except for the drum gear/bottom plate assembly, ALL of these parts have been through the ultrasonic cleaner.
 Assembly time. The green parts comprise a jig assembly that I built to steady the base as I install all the reconditioned parts. The cleaned up aluminum cover is at the right.
 SMOKE TEST TIME! At left, the reconditioned motor on the holding jig [green color]. A V W wiper switch is in the center and a 12 volt battery is on the right.  I like to leave the aluminum cover OFF for the smoke test, so I can....uhhh....see where the smoke comes from.... You can see the three brush holders at the top of the motor assembly. One speed motors have just two brush holders.    
This motor passed the test---no smoke and both speeds plus self park worked just fine.  I let these motors run for 10 minutes or so...just to make sure the smoke isn't just hiding out on me.
Ready to go.  Tested, serial numbered and eager to flop the wiper blades back and forth on someone's Beetle. Good stuff!

Tuesday, October 22, 2013

V4 SAAB 96 RESTORATION---PART 1

 From the dark, spider-infested depths of son Mark Ashcraft's shop emerged this pretty dang straight 1968 Saab 96 V4 Deluxe. We are starting a complete restoration on this car, which will include reconditioning or replacing bloody nearly everything mechanical PLUS a host of up-grades.
 You can see that the car is complete--even the made of "unobtanium" light covers are on the car and in very good condition. I'll completely recondition the transmission, the engine [to be 120 bhp 1700+ cc], distributor, alternator, starter, wiper motor, heater motor and a ton of other small stuff.  It will get a cooling system upgrade, including the "Florida Fix" side-of-hood vents, electric fan(s), and new everything in that area.
 Would you believe those are the original mud flaps and that they are in very good condition? Well, the suspension and brakes will be renewed, too, and if we find any rust, we'll simply cut that panel out and replace it with one of our heavy duty panels. 
This area will get a lot of attention, too. We'll rebuild the gauges, install one of our new dash tops and put in new upholstery and carpeting.  This car will not only look like new throughout, it will be BETTER in many ways because we use modern, heavy duty parts in many areas, some we manufacture ourselves.

If YOU would like this car, we can put your a name on it NOW, and can do the special touches to the car to make it YOURS!
Interested?  Contact me--work has already begun on the car.

Friday, October 11, 2013

FIAT TOPOLINO FIBERGLASS PART LAYUP--PART 2

 The rear license plate shroud is ready to be mounted on the car. This shows the license lights mounted, though I removed them for the bonding-in process. There is a stainless steel strip [with nuts welded to its back side] riveted to the light strip to receive the light mount bolts.
 AHA! The shroud is bonded in place on the spare tire cover of MR T. Final sanding and trimming is yet to be done.
 This is a good photo of the arse end of MR T. You can see a LOT of my fiberglass work, including the removable top, the rear fenders [with Triumph TR4 tail lamps], the fiberglass fuel tank filler door, the fiberglass bumper valence [bumpers not yet laid up], and the fiberglass spare tire cover, now with the license plate shroud bonded in place.
 A good rear view showing the 'glass parts. If you look carefully at the top area of the fiberglass top, you can see the "double bubble" I built into the top. If you look closely at the center of the bumper valence you will see a small square hole cut in the valence surface. Just inside the hole is a trailer hitch receiver. Just ahead of the right tail lamp assembly [sort of in the middle of the white bondo area] is the connector plug for the trailer lights wiring.  It's called "plan ahead".....  
 A low angle shot of the license plate shroud, showing the lights as well as the license plate location. The dark areas on the spare tire cover are where I added a ply of graphite cloth for extra strength.
The spare tire cover is hinged on the left and swings open as shown to remove the spare tire. You can see the wiring [with a disconnect plug] for the license lights and the cover prop. I used plug connectors throughout the car as I wired it. So far there are 68 plug connectors.....
I might have mentioned that I like working with fiberglass. Well, I also like working with auto electrical wiring. Heh heh heh....

FIAT TOPOLINO FIBERGLASS PART LAYUP--PART 1

 FIBERGLASS TIME!  I really LIKE working with fiberglass!These are carved and sanded urethane foam blocks, the basis for a rear license plate shroud for MR T, my '37 FIAT Topolino "EuroRod".  Also shown are multiple layers of 8-ounce bi-directional cloth. The foam blocks are stuck together with small dabs of "bondo", which I also used to stick the blocks down on an aluminum sheet that was covered with clear shipping tape.
 The layup is complete. The thin strip to the left is for a mount panel for the license plate lamps. I added a license plate to show the scale of the layups, which are ready to be trimmed. The dark areas of the layup show where I added a ply of graphite cloth, for extra strength.
 I used an air driven die grinder and cutter wheel [yes, I used eye protection] to cut the cured fiberglass. I used Fiberglast 2000 epoxy resin so the finished product is HARD, folks.
 Here are the finished, trimmed pieces, ready to be assembled.
This photo shows all the parts, with a South Dakota license plate for scale. The small strip is yet to be trimmed and fitted to the lamps, then bonded to the shroud. I use small dabs of "bondo" [catalyzed "hot"] to hold the light strip in place, then add narrow strips of cloth, with epoxy resin, to bond the strip into place.
Did I mention that I really like playing with fiberglass?

Next time: Bonding the shroud assembly to the spare tire cover of MR T.

Thursday, October 10, 2013

VISE MOUNT SHEET METAL BREAK TOOL

 This is a very useful tool that I built, patterned after plans I found in an ancient POPULAR MECHANICS magazine. On the left, in red, are all the parts for this little metal bender that I clamp in my bench vise. On the right, in green, is the first one I built. I've used it for about 10 years. It will bend a 12" wide piece of 18 gauge steel, or smaller widths of 16 gauge. The "holder" piece--the middle angle in the red parts shown--is adjustable fore and aft to accommodate different bend angles, up to about 115 degrees.
The operation is straight forward--put in the piece to be bent, set the holder angle where you want it, tighten down the nut on each end of the holder and lift the handle. Bend the piece to the angle you want. You can see how a piece of metal can be bent into more than one angle and it produces a nice crisp bend every time.
I'm amazed at how often I use this critter--it works really well! Want one? Contact me.  

Saturday, September 21, 2013

WEBER DCOE CARBURETORS AND PARTS

 Everybody with gasoline in their veins loves Weber DCOE carburetors. This is the setup on my 2-litre twin cam Fiat 124 Spider engine, shown with the 5 speed trans attached. This is the engine in MR T, my 1937 FIAT Topolino "EuroRod." I find that I have more DCOE's than I can use in my lifetime, so someone else who wants to GO FAST can own them.  DCOE's are great carburetors, and once you get them set right, you can forget about 'em and just go have fun.
 Here's a list of the carburetors and parts. Note that a Lynx intake manifold--to fit the carbs to twin cam FIAT or LANCIA engines is listed. The manifold, and most of the parts, are NEW. I prefer to let the whole lot go, and not sell bits here and there.
 These 40 DCOE 24's are a matched pair. That means they are all jetted the same inside. Shown are the new air filters and a set of four aluminum velocity stacks. You can see the new LYNX intake manifold to the left of the carbs.
This photo shows the other two DCOE's, some of the linkage parts, the four venturi's, and the other velocity stacks that I mention. The two flat gaskets fit behind the velocity stacks.
If "Mr GoFast" is your name and DCOE's are your game, give me a growl. Another 40 horsepower under the hood of your car--what can it hurt?  Heh heh heh.......

Friday, September 6, 2013

SONETT TRANSMISSION COFFEE TABLE?

 I completely reconditioned this Saab Sonett transmission and kept it as a spare for my last Sonett. Then I got soft in the head and sold the Sonett, and the new owner didn't think he needed a spare transmission. I discussed using it for a coffee table mount with my wife, which turned out to be a short discussion. So it is available for someone who needs it for his/her Sonett.
The trans has new bearings, seals, gaskets and a number of other internal parts. You can see the new clutch release bearing and rebuilt release arm in this photo. I made all the internal adjustments to Saab spec's. The freewheel has been "neutered", using one of my neuter kits. Its READY TO GO! But I still think it would make an interesting coffee table.... 
If you're interested, give me a growl.

Sunday, August 18, 2013

SAAB SONETT III GLASS HATCH LATCH COVER

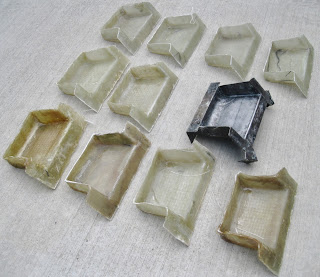
 These are NOT fiberglass bolt bins, though they ARE fiberglass. Each, except for the dark one in the center right, is the main body of a cover for a glass hatch latch, for a Saab Sonett III.  The dark one is the steel mould for these things that I built about 25 years ago. The ten bodies shown have been popped out of the mould and trimmed, at this point.
 Here is another view of the ten latch bodies [I believe in mass production, y'see...] and the steel mould. Each latch body has 8 plies of 8 ounce fiberglass cloth. The resin matrix is polyester. You know---that stinky boat resin stuff.
 You can see that I have added a flat fiberglass plate on what will be the TOP surface of each cover. I pre-drilled the holes in the plates before bonding them to the main cover bodies.  The rusty colored "thing" at the bottom is an original, factory plastic latch cover. The sun warps the plastic, makes it brittle and most of them found on Sonett III cars these days are complete junk. 
 Three further stages of assembly are shown here. On the left, the cover with plastic filler completely sanded, ready for paint. In the center, a cover in primer, wet sanded and ready for color. On the right a cover painted and ready for installation in a Sonett III.  There is a whole LOT of hand labor making these things look this good. Sand, fill, sand, fill, swear, sand, swear, fill, swear....
Another view of the last three stages. I supply new stainless steel 1/4-20 bolts and stainless washers with these completed latch covers. These critters won't warp or get brittle--they'll probably outlast the rest of the car. Pretty neat, eh?

Sunday, August 4, 2013

SMITH'S MOTORCYCLE TACHOMETER--BRIT MONKEY-MOTION

 This is a study in contrasts. In a vertical row on the left, parts of a British Smith's tachometer. The vertical row on the right shows the similar parts of a U.S. Stewart-Warner tachometer. Both are cable driven. The Smith's unit used what was called a "chronometric" internal mechanism to motivate the needle around the dial. The S-W unit used a common, and very simple, rotating magnet to move the needle.  The Smith's tach was built around 1950, before the Brits had discovered magnetism, I think; the S-W unit around 1960. 
 You want contrasts, here's more. The Smith's tach [left] has a brass face and cast aluminum frame. The S-W tach a thin steel face and plastic frame. But the BIG contrast is in the internal gubbins. Just look at all that "stuff" in the Smith's unit. Levers and gears and balance arms and a couple of crude camshafts, and some other items identifiable only if you live in the outskirts of Coventry, England.  The S-W uses, simply, a rotating magnet in sort of a modified half cup shape that rotates around the round "can" that is connected to the speed needle. 
 There was at least SOME justification for Smith's use of the monkey-motion mechanism. First they used the chronometric jazz in their speedometers. If you look closely at the frame of the Smith's unit you will see holes in the legs of the frame where--if this were used in a speedometer--the odometer registers would be fitted. Take out the odometer gubbins and Presto! Instant tachometer! Clever, aye, mate?
 Well....yes and no. There is this thing called complexity. Murphy's law says that the more "stuff" in a unit, the more apt the unit is to screw up.  When I received the Smith's tach, the needle would go to maybe 15 [x100] rpm and stop. It looked like it had been Arabia with Sir Lawrence [who wasn't a "Sir" then] and needed TWO baths in the ultrasonic unit with clock cleaning fluid. Then a rinse, then careful oiling with clock oil. I didn't have high hopes for the sucker.
But I put it on the test bed and started the [anti-clockwise] rotation and th' blinkin' blighter started working! Chronometric tachs sort of step up, in about 500 rpm jerks. This one settled down at 6800 rpm, steady as a Spitfire in a dive after an ME-109. When the input rpm is slowed to a stop, the chrono tach backs down in about 2500 rpm steps.
Amazing what can happen when you get 65 years of dirt, dust and sand out of all of the monkey-motion bits in one of these critters.
But I look forward to peering into the bowels of a Smith's tach after they discovered magnetism....that happened in about 1990, if memory serves me correctly....

Friday, August 2, 2013

ANCIENT VOLKSWAGEN INSTRUMENTS


 Believe it or not, what you see above are instruments from a 1950 VW Beetle. I received these beat-up buggers from a customer with a plea to make 'em "like new."  On the left, two speedometers, on the right a wind-up clock. In the center, two "pods", as VW folks call them, that hold the speedo and clock and then bolt into appropriately sized holes in the instrument panel.
 This is the flip side of one speedo, the clock and the pods. Note that the speedo pod also mounts the ignition switch, and switches for lights and windshield wipers. As you can see, 65 years allows pleanty of time for crud to build up on all the bits.
 Both pods are cast in bakelite, as far as I can tell. Four idiot light mounts are also cast into the pod. There was quite a bit of brass--for wire connections, etc--to be polished up, and the switches had to be disassembled and cleaned, then reassembled--in the correct order and orientation. The bits only go [correctly] together one way.
 The clock--cleaned up and ticking--in its cleaned, primed and painted pod. The shaft at the bottom combines to wind and set the time of the ol' ticker.  The new rubber seal [black in the photo] around the pod cushions the unit in the panel.
Here are the pair, ready to go to the owner. Note the switch knobs--very much 1950's style--on the speedo pod. These are to go into a completely restored Beetle, and will probably be the highlight of the interior of the wee bug. They led me a merry chase, but I'm quite pleased with the final result. Good stuff...